Selecting the right addressable LED strips for your business can be incredibly complex. The sheer number of options, specs, and technologies can be overwhelming, making it hard to choose the best solution.
Imagine the frustration of choosing an LED strip that doesn’t meet your needs. Wasted time, increased costs, and subpar lighting solutions can hurt your business, leaving spaces looking unprofessional and uninspiring. The wrong choice can lead to compatibility issues and technical problems, disrupting your operations.
Addressable LED strips offer unmatched customization and control, but you need to know how to choose the right one. By understanding your requirements and the various technologies available, you can make informed decisions and achieve the perfect lighting for your business.
Ready to make the best choice for your lighting needs? Dive into these valuable resources to get started:
- Addressable LED Strip Product List
- DMX512 Addressable LED Strip VS. SPI Addressable LED Strip
- RGB vs. RGBW vs. RGBIC vs. RGBWW vs. RGBCCT LED Strip Lights
- Dim To Warm – What It Is and How Does It Work?
- What is RGB Lighting?
- How to Wire LED Strip Lights (Diagram Included)
- Everything You Need to Know About DMX512 Control
- LED Controller: A Comprehensive Guide
What Is An Addressable LED Strip?
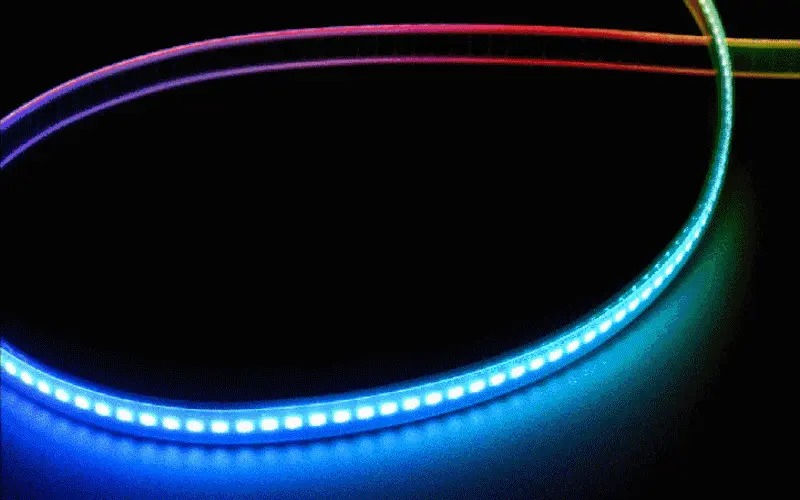
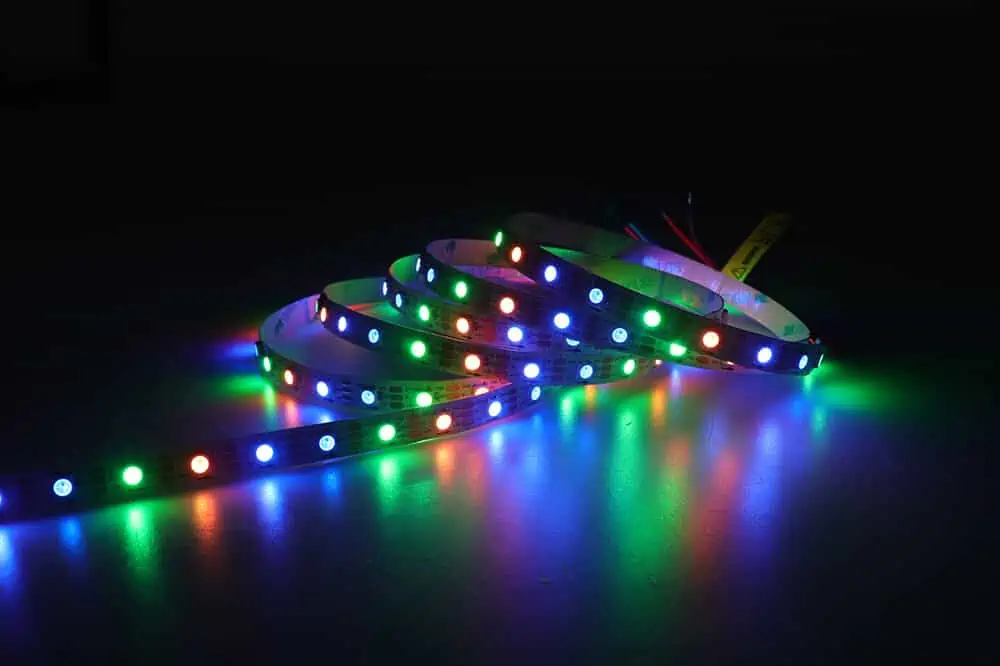
An addressable LED strip, at its core, is a flexible circuit board populated with LEDs that you can control individually. This means each LED—or a small group of LEDs—can display a different color or brightness at the same time as others on the same strip. The ‘addressable’ part refers to the ability to control each LED’s color and brightness individually, thanks to an integrated circuit (IC) embedded within or attached to each LED. This feature sets them apart from traditional LED strips, where the entire strip displays one color at a time.
Addressable LED strips come in various forms, including different lengths, LED densities (the number of LEDs per meter), and color capabilities, ranging from RGB (Red, Green, Blue) to RGBW (Red, Green, Blue, White) for added color mixing and white light options. The flexibility in control and customization is why they’re a favorite for DIY enthusiasts, lighting designers, and anyone looking to add a personal touch to their lighting solutions.
The magic behind addressable LED strips lies in their programmability. With the right controller and software(Such as Madrix, resolume), you can create dazzling displays, subtle mood lighting, or dynamic effects for gaming setups, home theaters, architectural features, and more. Whether you’re planning a complex commercial project or simply spicing up your living space, addressable LED strips offer a versatile and vibrant solution.
Addressable LED Strip VS Non-addressable LED Strip
When it comes to LED strips, the choice between addressable and non-addressable types is crucial depending on your project’s needs. Both have their advantages, but understanding their differences is key to making an informed decision.
Addressable LED strips offer individual control over each LED, allowing for complex lighting effects, animations, and color changes that can be synchronized with music, games, or other inputs. They’re ideal for dynamic lighting projects where creativity and customization are paramount. In contrast, non-addressable LED strips light up in a single color at a time, making them suitable for straightforward, consistent lighting applications where simplicity and cost-effectiveness are desired.
To illustrate these differences more clearly, let’s compare them in a table format:
| Feature | Addressable LED Strip | Non-addressable LED Strip |
| Control | Individual LED control | Whole strip control |
| Colors | Full RGB color spectrum per LED | Single color or RGB for the entire strip |
| Wiring | Requires data line(s) for control signals | Only power and ground lines needed |
| Applications | Dynamic displays, mood lighting, entertainment | General illumination, accent lighting |
| Complexity | Higher (due to programming needs) | Lower |
| Cost | Generally more expensive | Less expensive |
Addressable LED strips are the choice for those seeking to push the boundaries of lighting design, offering unparalleled flexibility and creative potential. Non-addressable strips, however, are not to be underestimated; they provide a reliable, cost-effective solution for many lighting needs, from under-cabinet lighting to simple accent lighting in commercial and residential spaces.
Choosing between addressable and non-addressable LED strips ultimately depends on your project’s requirements, budget, and the level of control you wish to have over your lighting effects.
How Do Addressable LED Strips Work?
The proper functioning of an addressable LED strip is achieved by five main components working together. They include
- Light-emitting diodes (LEDs)
- Integrated circuit chips (ICs)
Understanding how addressable LED strips work is key to unlocking their full potential. Each LED on an addressable strip is connected to a microcontroller, which receives and processes signals to control the color and brightness of individual LEDs or groups of LEDs. This is achieved through digital communication protocols such as SPI (Serial Peripheral Interface) or DMX512 (Digital Multiplex), which send instructions to the LEDs about which color to display and when.
The heart of an addressable LED strip’s functionality lies in its integrated circuits (ICs). These ICs are programmed with unique addresses that correspond to their position on the strip. When you send a command through a compatible controller, the IC interprets the instruction and changes the LED’s color and brightness accordingly. This allows for precise control and synchronization of complex lighting effects across the entire strip.
The programming of addressable LED strips can be done through various software platforms, offering a range of complexity from simple color changes to intricate animations. For the tech-savvy and creative individuals, this means the ability to design custom lighting effects tailored to specific needs or moods. Whether it’s setting the ambiance for a party, creating an immersive gaming experience, or adding dynamic lighting to art installations, the possibilities are virtually endless.
In summary, the combination of addressable technology, ICs, and digital communication protocols allows these LED strips to perform a wide array of lighting displays, making them a versatile tool in both decorative and functional lighting applications.
How To Tell If An LED Strip Is Addressable?
Identifying whether an LED strip is addressable or not can be straightforward if you know what to look for. The key difference between addressable and non-addressable LED strips lies in the wiring and the presence of integrated circuits (ICs) for individual LED control. Here’s how you can tell them apart:
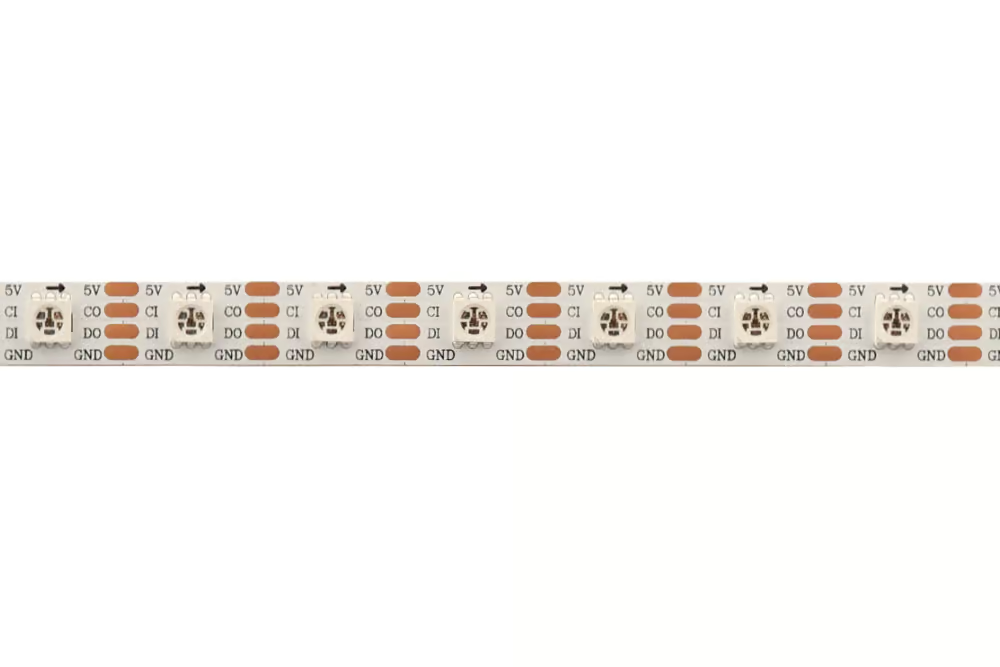
- Check the Wiring: Addressable LED strips often have three or more wires – one for power, one for ground, and at least one data line. In contrast, non-addressable strips typically only have two wires for power and ground since the entire strip operates in unison.
- Look for Integrated Circuits (ICs): If you see small chips between the LEDs or integrated into the LED package itself, it’s a good sign the strip is addressable. These ICs control each LED individually, a feature not present in non-addressable strips.
- Examine the LED Density: Addressable strips may have fewer LEDs per meter compared to non-addressable ones. This is because each LED on an addressable strip requires individual control, and spacing them out can help manage heat and power consumption.
- Manufacturer’s Specifications: The most foolproof method is to check the product specifications or ask the manufacturer directly. Addressable LED strips are often clearly marketed as such, featuring terms like “individually addressable,” “digital,” or referencing specific control protocols like “WS2812B,” “APA102,” or “DMX512.”
- Arrow Marks on PCB: Additionally, you can check for arrow marks printed on the PCB of the addressable LED strip. These arrows indicate the direction of signal transmission, a detail unique to addressable strips as it helps ensure correct orientation during installation.
Remember, the ability to control each LED individually for color and brightness is what sets addressable strips apart. If you’re still unsure, looking for these details can help you determine whether you have an addressable LED strip, allowing you to tap into the vast potential of customized lighting solutions.
What Are Addressable LED Strips Used For?
Addressable LED strips have found their way into a wide array of applications, thanks to their versatility and the unique control they offer over lighting. From creating atmospheric home environments to adding sophistication to commercial spaces, the possibilities are virtually limitless. Here’s a glimpse into the myriad of uses for addressable LED strips:
- Home Decoration and Ambiance: Addressable LED strips can transform a room by adding dynamic, mood-enhancing lighting. They’re perfect for under-cabinet lighting in kitchens, behind TVs for bias lighting, or around the ceiling to add a cozy, inviting glow to any room.
- Commercial and Retail Spaces: Businesses use addressable LED strips to create eye-catching displays, highlight products, or set the mood in restaurants and clubs. The ability to change colors and patterns allows for branding flexibility and creating engaging customer experiences.
- Events and Entertainment: From concerts to weddings, addressable LED strips add a layer of visual excitement. They can be programmed to match the event’s theme, sync with music, or even guide guests through different areas with changing colors.
- Gaming and Streaming Setups: Gamers and streamers use addressable LEDs to enhance their setups with vibrant backlights, creating an immersive experience. The LEDs can react to game sounds, change colors based on in-game events, or simply add a personalized touch to the gaming environment.
- Art and Creative Projects: Artists and DIY enthusiasts use addressable LED strips in sculptures, installations, and wearables. The ability to control each LED allows for the creation of intricate, dynamic pieces that can change and evolve.
The flexibility and control offered by addressable LED strips make them a go-to choice for anyone looking to add a personal or professional touch to their lighting needs. Whether it’s for practical illumination or creating an atmosphere, these strips bring creativity and functionality together in a way traditional lighting solutions can’t match.
Types of Addressable LED Strip Lights
Addressable LED strip lights come in various types, each designed to cater to different needs and preferences. Among the most popular are DMX512 and SPI addressable LED strips, each with unique characteristics and control methods. Understanding these differences is crucial for selecting the right type for your project.
DMX512 Addressable LED Strip Lights
DMX512 (Digital Multiplex) is a standard for digital communication networks that are commonly used to control stage lighting and effects. DMX512 addressable LED strips are known for their reliability and are widely used in professional settings such as theaters, concerts, and clubs. They can handle long distances between the controller and the LED strips without signal degradation, making them ideal for large installations.
The DMX512 addressable led strip is an LED strip that receives DMX512 signals directly, without a DMX512 decoder, and changes the color and brightness of the light according to the signal.
SPI Addressable LED Strip Lights
SPI (Serial Peripheral Interface) addressable LED strips are another popular type, favored for their ease of use and flexibility. SPI strips are particularly well-suited for DIY projects and smaller installations where complex control systems are not necessary. They can be easily controlled with a variety of microcontrollers, including Arduino and Raspberry Pi, offering a more accessible entry point for hobbyists and enthusiasts.
SPI addressable LED strips can be further categorized based on their signal type and functionality:
- Single Signal Addressable LED Strips: These strips require only one data signal to control the LEDs, making them simpler to program and connect.
- Dual Signal Addressable LED Strips: These offer enhanced reliability through a backup data line. If one line fails, the other can maintain the control signal, reducing the risk of lighting failures.
- Breakpoint Resume Addressable LED Strips: These strips can continue transmitting data even if one LED fails, ensuring that the entire strip remains functional.
- Data + Clock Signal Addressable LED Strips: This type of addressable LED strip includes a clock signal in addition to the data signal, such as SK9822 and APA102. The addition of a clock signal allows for more precise control over the timing of data transmission, which can be particularly beneficial in environments where signal integrity may be compromised, or high-speed data transmission is required.
Choosing between DMX512 and SPI addressable LED strips depends on the scale of your project, the required reliability, and your comfort level with programming and electronics. Both types offer unique advantages, whether you’re creating a dynamic lighting display for a public venue or experimenting with custom lighting effects at home.
The SPI addressable led strip is an LED strip that receives SPI signals directly, and changes the color and brightness of the light according to the signal.
DMX512 Addressable LED Strip VS SPI Addressable LED Strip
When deciding between DMX512 and SPI addressable LED strips for your project, understanding the nuances of each protocol is essential. Both offer unique advantages, but their differences could significantly impact the execution and performance of your lighting designs.
DMX512 is revered for its robustness and ability to handle complex lighting setups over long distances without signal loss. This makes it a staple in professional environments where reliability is paramount. It’s designed for real-time control, capable of managing large installations with many fixtures and lights, including addressable LED strips.
SPI, on the other hand, is celebrated for its simplicity and flexibility, especially in smaller projects or where the user has more direct control over the programming. It’s a favorite among hobbyists and those working on custom installations because it easily interfaces with popular DIY electronics platforms.
To further clarify their differences, here’s a comparison in table format:
| Feature | DMX512 Addressable LED Strip | SPI Addressable LED Strip |
| Control Protocol | Standardized for lighting industry | Simple serial interface |
| Signal Type | Differential signaling for robustness | Single-ended, more susceptible to noise |
| Distance | Suitable for long-distance installations | Best for shorter distances |
| Complexity | Requires DMX controller and potentially more complex setup | Simpler to set up with common microcontrollers |
| Applications | Professional stage, architectural lighting | DIY projects, home decoration |
| Cost | Higher due to professional-grade equipment | Generally more affordable |
Choosing between DMX512 and SPI should be based on the project’s scale, the environment in which the LED strips will be used, and the user’s technical expertise. DMX512 is the go-to for professional, large-scale installations requiring high reliability. In contrast, SPI offers a more accessible and flexible option for those experimenting with custom lighting projects or working on a smaller scale.
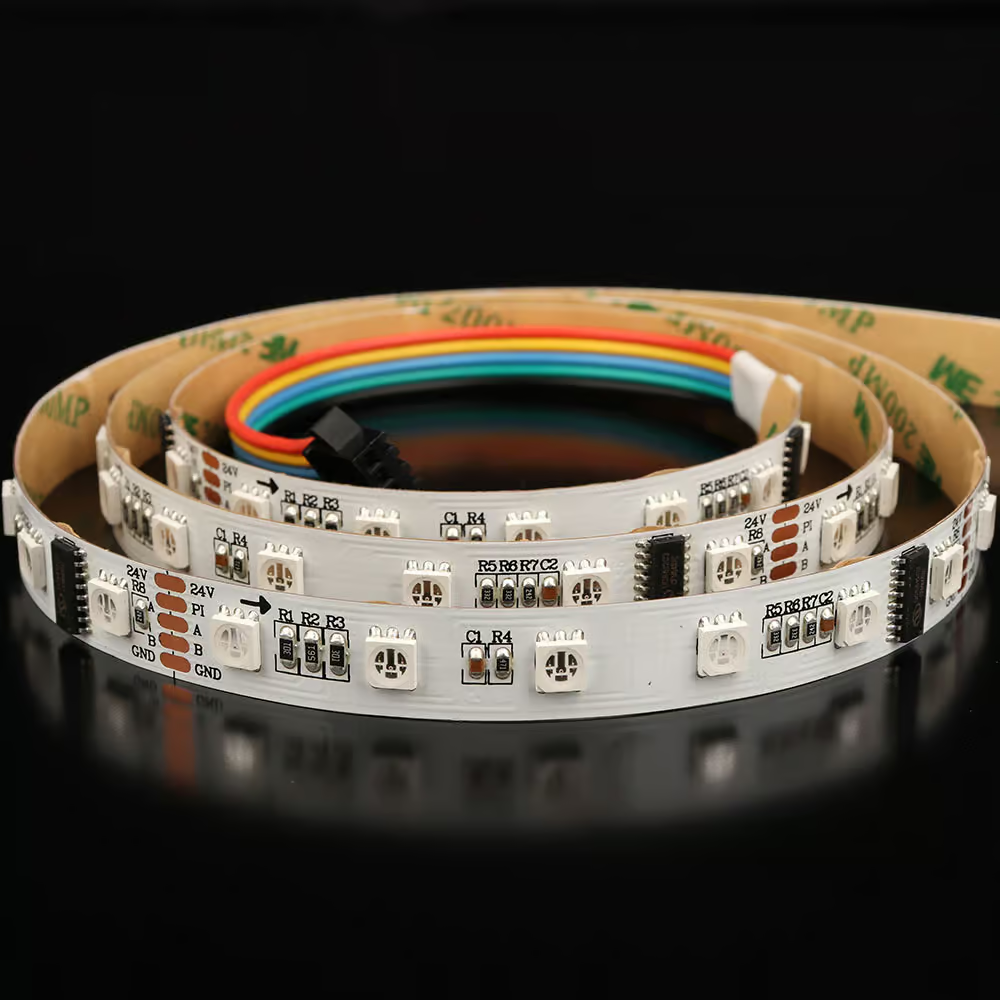
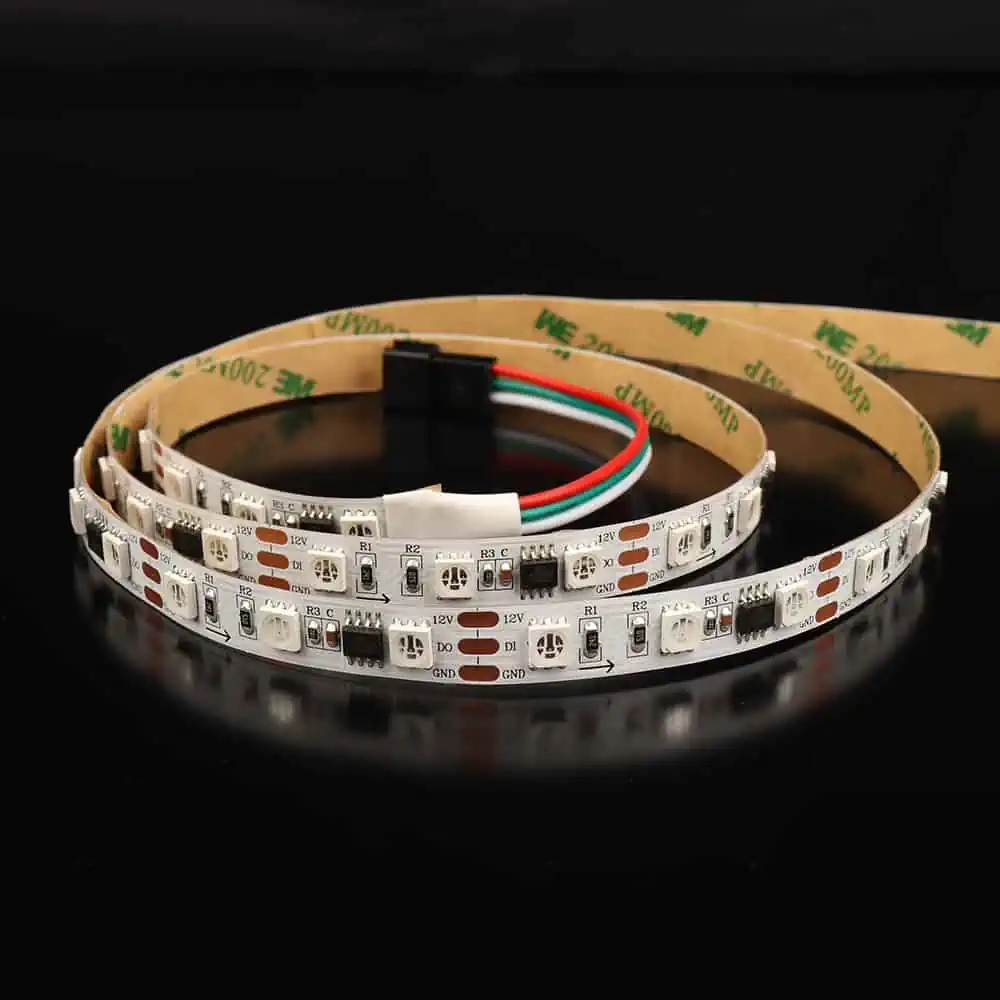
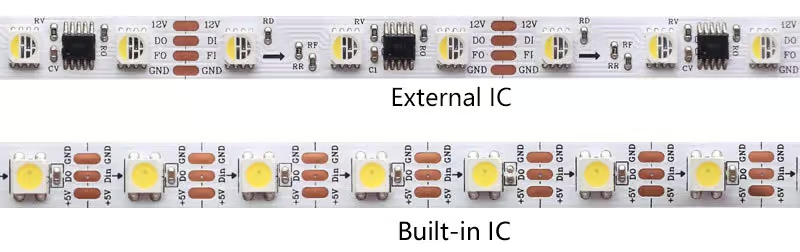
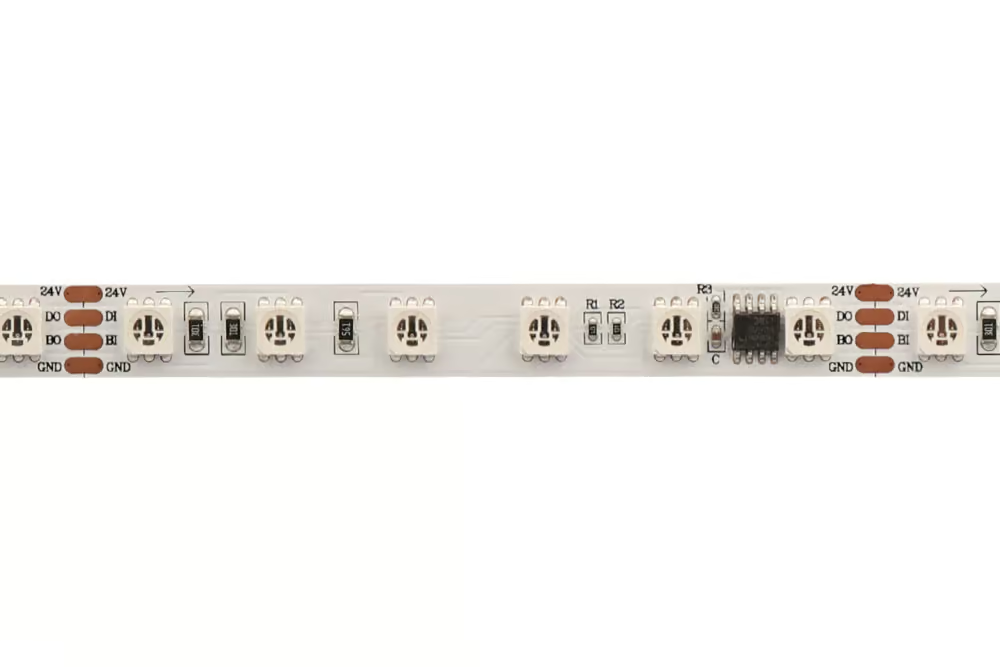
Built-in IC vs. External IC
In the realm of addressable LED strips, the distinction between built-in ICs (Integrated Circuits) and external ICs is crucial for understanding how each LED is controlled and the overall design of the strip. This choice impacts not only the installation process but also the strip’s flexibility and how well it can be integrated into various projects.
Built-in IC LED strips have the controlling circuit integrated within the LED package itself. This design simplifies the strip’s appearance and can make installation easier, as there are fewer components to manage. The compact nature of built-in IC strips often results in a cleaner look, ideal for visible installations where aesthetics are important. However, this integration can sometimes limit repairability; if an LED or its IC fails, the affected section may need to be replaced entirely.
External IC LED strips, conversely, feature separate control chips located along the strip, not within the LED packages. This configuration can offer more flexibility in terms of repair and customization, as individual components can be more easily replaced or modified. While external ICs might make the strip bulkier or more complex to install, they often allow for more robust troubleshooting and are preferred in applications where long-term maintenance and serviceability are concerns.
To compare these options more directly, let’s look at them in a table format:
| Feature | Built-in IC LED Strips | External IC LED Strips |
| Aesthetics | Sleeker, more integrated design | Potentially bulkier due to separate ICs |
| Installation | Generally simpler, fewer components | Might be more complex, but allows for customization |
| Repairability | Less flexible, may require replacing larger sections | More serviceable, individual components can be replaced |
| Application | Ideal for decorative purposes where appearance is key | Suited for professional or long-term projects requiring maintenance |
Whether you choose built-in or external ICs for your addressable LED strip project will depend on your priorities: the ease of installation and aesthetics or the flexibility and maintainability of the lighting system. Each type has its advantages, and the best choice varies based on the specific needs and constraints of your project.
What is Pixel of Addressable LED Strip?
When delving into the world of addressable LED strips, the term “pixel” frequently comes up, but what exactly does it mean in this context? Understanding the pixel composition of these strips is crucial for anyone looking to create detailed and dynamic lighting effects.
Pixel Definition
In the realm of addressable LED strips, a “pixel” refers to the smallest controllable element of the strip. This can vary based on the voltage and design of the strip. Generally, for 5V strips, one LED constitutes a single pixel, offering individual control over that LED’s color and brightness. At 12V, a pixel can either be one LED or consist of three LEDs grouped together as a single controllable unit. Meanwhile, 24V strips often have six LEDs per pixel, further impacting control granularity and power distribution.
Calculating the Length of an Addressable LED Strip Connected to a Controller
DMX512 Addressable LED Strip
For DMX512 controllers, which are designed to handle 512 channel addresses per universe, calculating the maximum length of an addressable LED strip it can control requires a few steps. First, determine whether the strip is RGB or RGBW since an RGB pixel uses three channel addresses, while an RGBW pixel uses four. Next, identify the number of pixels per meter on the strip. Multiplying the number of pixels by the channel addresses per pixel gives you the total channel addresses per meter. Dividing 512 by this number yields the maximum length of strip a single universe can control.
Example: For a 5050, 60LEDs/m, RGBW DMX512 addressable LED strip with 24V and 10 pixels per meter, the calculation would be as follows:
- Each RGBW pixel uses 4 channel addresses.
- With 10 pixels per meter, that’s 40 channel addresses per meter.
- Therefore, a single DMX512 universe (512 channels) can control up to ( \frac{512}{40} = 12.8 ) meters of this LED strip.
SPI Addressable LED Strip
The calculation for SPI addressable LED strips is more straightforward. Simply check the maximum number of pixels your controller supports, then divide this by the number of pixels per meter on your LED strip to find out the maximum strip length it can manage.
Example: If an SPI controller supports up to 1024 pixels, and the strip has 60 pixels per meter, the maximum length the controller can handle is ( \frac{1024}{60} \approx 17 ) meters.
Understanding these calculations is essential for anyone planning to incorporate addressable LED strips into their projects, ensuring compatibility and functionality between the strips and their controllers.
What is PWM Frequency of IC?
PWM (Pulse Width Modulation) frequency of an Integrated Circuit (IC) refers to the rate at which the IC can turn its output on and off to control the brightness of LEDs or the speed of a motor. The frequency is measured in Hertz (Hz), indicating the number of cycles per second. A higher PWM frequency is particularly important in lighting applications, such as with addressable LED strips, because it reduces the likelihood of flicker that can be detected by the human eye or captured by video recorders. When the PWM frequency is high enough, the on-off cycling of the LEDs happens so rapidly that the visual persistence of the human eye perceives it as a continuous light source without flicker. This is crucial not only for creating stable and comfortable lighting environments but also for ensuring that video recordings in the vicinity of these lights do not capture distracting or unprofessional-looking flicker effects. Therefore, choosing ICs with a higher PWM frequency is essential for applications requiring smooth dimming or color changing effects and for avoiding flicker in photography and videography.
Maximum Distance of Signal Transmission
When implementing lighting systems, understanding the maximum distance of signal transmission is crucial for ensuring reliable communication between the controller and the LED strips. This factor significantly impacts the design and feasibility of large-scale installations.
The Maximum Transmission Distance of DMX512 Signal
The DMX512 protocol, celebrated for its robustness and reliability in professional lighting applications, allows for a considerable maximum signal transmission distance. Typically, a DMX512 signal can be transmitted up to 300 meters (approximately 984 feet) under optimal conditions, utilizing proper cabling (such as 120-ohm, low-capacitance, twisted-pair cable). This capability renders DMX512 suitable for a wide array of applications, including large venues, outdoor events, and architectural lighting projects that necessitate significant distances between the controller and LED fixtures. Maintaining signal integrity over such distances necessitates the use of high-quality cables and connectors.
The Maximum Transmission Distance of SPI Signal
Conversely, the SPI (Serial Peripheral Interface) signal, preferred for its simplicity and ease of use in DIY projects and smaller installations, supports a generally shorter maximum transmission distance. For most SPI-based LED strips, the maximum reliable transmission distance typically refers to the distance between two ICs or between the LED strip and the controller. This distance is generally around 10 meters (approximately 33 feet). However, a unique feature of SPI LED strips is that when an IC receives a signal, it not only controls the color change of the LED but also amplifies the signal before passing it on to the next IC. This means that the actual maximum transmission distance can extend significantly beyond 10 meters, as the signal is effectively regenerated at each IC along the strip, allowing for longer runs without loss of signal integrity.
Understanding the specifics of signal transmission distance is essential for planning and implementing lighting projects, ensuring that the selected control protocol meets the project’s scale and layout requirements effectively.
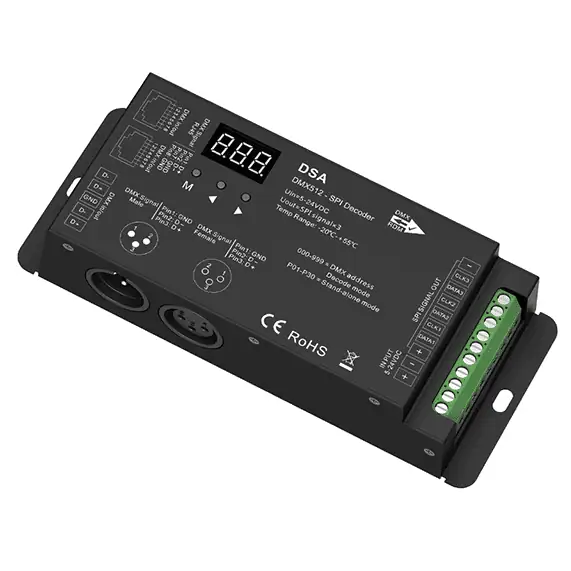
Can I Connect SPI Addressable LED Strip to DMX512 Controller?
Yes, connecting an SPI addressable LED strip to a DMX512 controller is indeed possible, but it requires an intermediary device known as a DMX512 to SPI decoder. This setup involves first connecting your SPI addressable LED strip to the DMX512 to SPI decoder. Then, this decoder is connected to the DMX controller. The decoder acts as a bridge between the two different protocols, translating DMX512 signals into SPI commands that the LED strip can understand. This allows for seamless integration of SPI addressable LED strips into lighting systems originally designed for DMX512 control, expanding the possibilities for creative lighting projects that utilize the specific advantages of both systems.
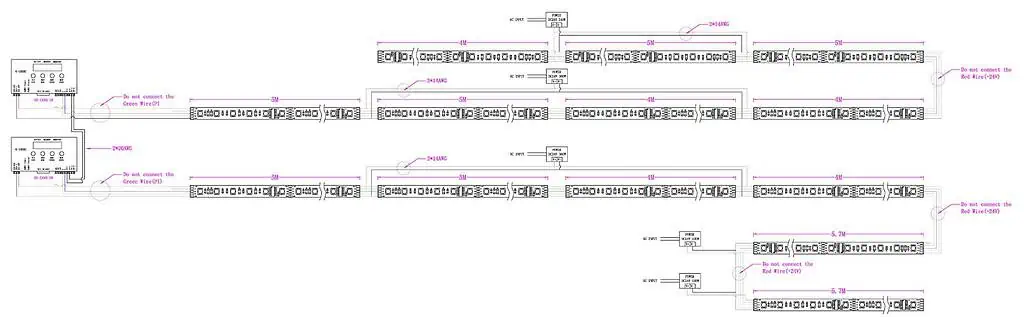
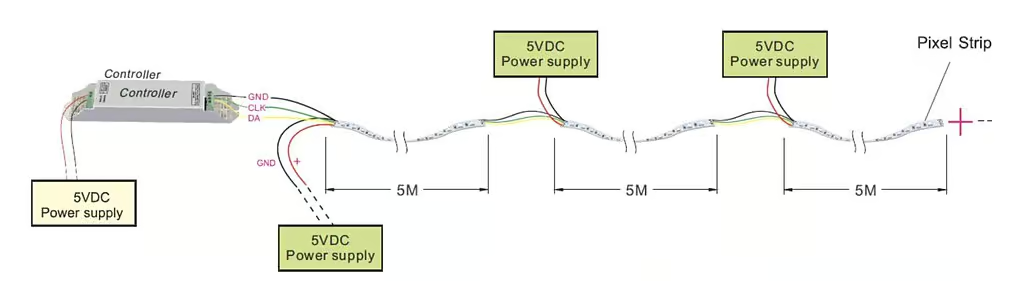
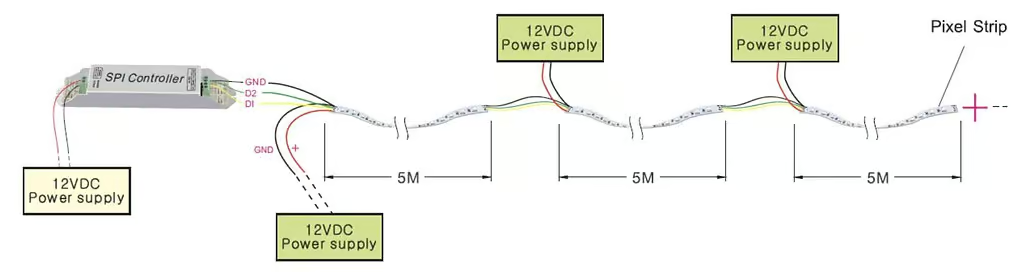
Power Injection of Addressable LED Strip
Power injection is a critical technique used in the installation of addressable LED strips, especially for longer runs where voltage drop can be a significant issue. Voltage drop occurs as electrical current travels along the length of an LED strip, resulting in the LEDs at the far end appearing dimmer than those closer to the power source. To counteract this effect and ensure uniform brightness across the entire length of the strip, power injection involves supplying power directly to multiple points along the strip, rather than solely at one end.
This process requires connecting additional power wires from the power supply to various points on the LED strip, effectively ‘injecting’ power where it starts to wane. The exact intervals at which power should be injected depend on several factors, including the voltage of the strip (5V, 12V, or 24V), the type of LEDs, and the total length of the installation. As a general rule, injecting power every 5 to 10 meters (approximately 16 to 33 feet) is recommended to maintain consistent lighting.
It’s essential to ensure that the power supply used for injection has the capacity to handle the total load of the LED strip and that all connections are made securely to prevent electrical shorts. Additionally, matching the voltage of the power supply with that of the LED strip and ensuring polarity is consistent across all injection points are crucial for the safe and effective operation of the lighting system.
Power injection not only enhances the visual quality of LED installations by providing uniform brightness but also extends the lifespan of the LEDs by preventing overloading and overheating issues. Properly implemented, power injection can significantly improve the performance and appearance of addressable LED strips in both small and large-scale projects. For more information, please check How To Inject Power Into LED Strip?
How To Choose The Right Addressable LED Strip?
Selecting the perfect addressable LED strip for your project involves considering various factors to ensure that the strip meets your needs in terms of functionality, aesthetics, and performance. Here are the key aspects to consider:
Voltage
Choose between common voltages like 5V, 12V, or 24V. Lower voltages (5V) are typically used for shorter strips or individual LED projects, while higher voltages (12V, 24V) are better for longer runs as they can help reduce voltage drop.
Power consumption
Calculate the total power requirement. Look at the wattage per meter and multiply by the total length you plan to use. Ensure your power supply can handle this load, with a bit of headroom for safety.
Type of Colors
The addressable LED strip is available in a wide range of colors.
Single Color: White, Warm White, Red, Green, Blue, Yellow, Pink, etc.
Dual Color: White + Warm White, Red + Blue, etc.
RGB
RGB + White
RGB + Warm White + White
For more information, please check RGB vs. RGBW vs. RGBIC vs. RGBWW vs. RGBCCT LED Strip Lights.
DMX512 vs. SPI
When choosing between DMX512 and SPI protocols, consider the complexity of your project and the control system:
- DMX512 is ideal for professional lighting setups requiring long runs and high reliability. It’s widely used in stage and architectural lighting.
- SPI strips are better suited for hobbyists and DIY projects due to their simplicity and ease of use. They work well with microcontrollers like Arduino and Raspberry Pi for custom lighting solutions.
Type of Integrated circuit chips (ICs)
DMX512 is an international standard protocol. Different types of DMX512 ICs may have different performances, but the supported protocols are the same, which means that the same DMX512 controller can control different types of DMX512 ICs. However, SPI is not an international standard protocol. SPI ICs produced by different manufacturers support different protocols, which means that different SPI ICs may need to be used with different SPI controllers. Below I list the common IC models on the market.
DMX512 addressable led strip: UCS512, SM17512
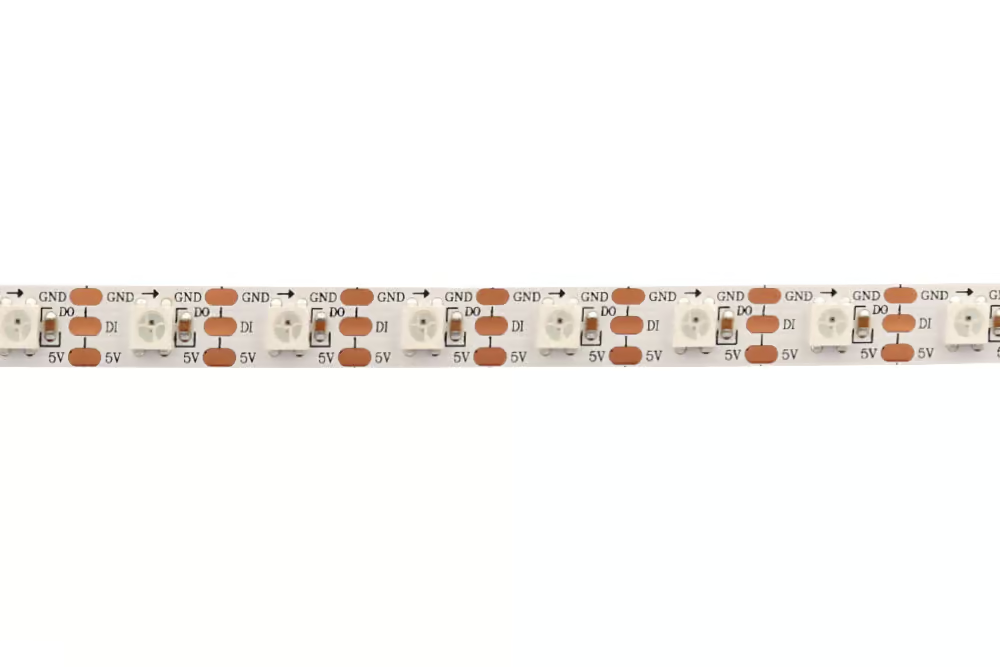
SPI addressable IC is divided into built-in IC and external IC or divided into resumed transmission with breakpoint and resumed transmission without breakpoint or divided into with clock channel and without clock channel.
SPI Addressable led strip common built-in IC models: WS2812B, WS2813, WS2815B, SK6812, SK9822, APA102, CS2803, CS8812B
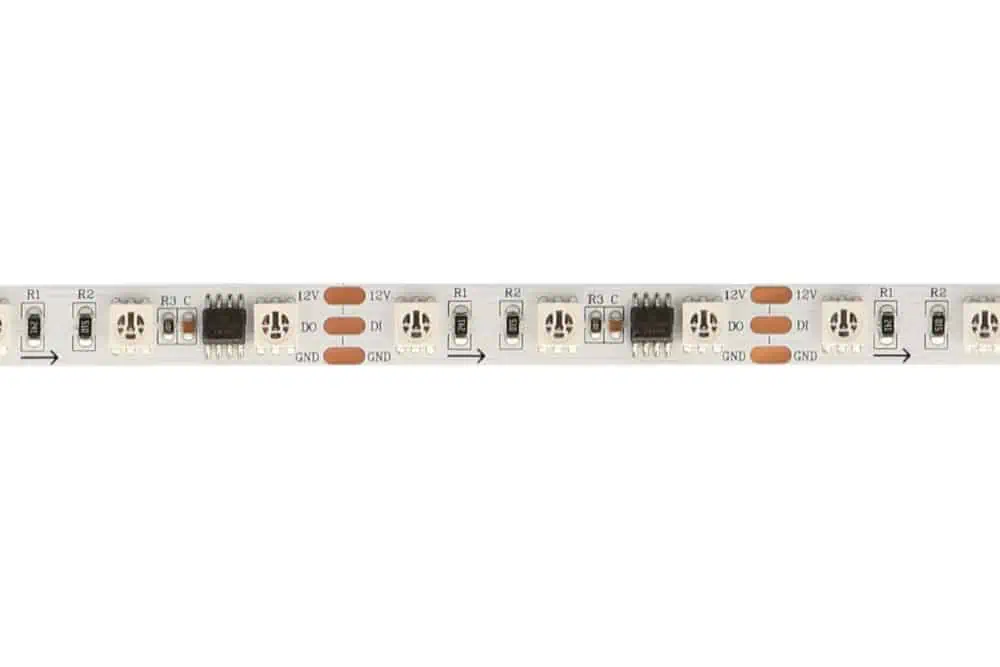
SPI Addressable led strip common external IC models: WS2801, WS2811, WS2818, UCS1903, TM1814, TM1914, TM1812, CS8208, CS6816, CS6814, LPD8806
What is brakpoint resume function of SPI addressable led strip?
The breakpoint resume function means that when only one IC fails, the signal can still be passed on to subsequent ICs.
SPI Addressable led strip common IC models with breakpoint resume function: WS2813, WS2815B, CS2803, CS8812B, WS2818, TM1914, CS8208
SPI Addressable led strip common IC models without breakpoint resume function: WS2812B, SK6812, SK9822, APA102, WS2801, WS2811, UCS1903, TM1814, TM1812, CS6816, CS6814, LPD8806
Common IC models with clock channel: SK9822, APA102, WS2801, LPD8806
Common IC models without clock channel: WS2812B, WS2813, WS2815B, SK6812, CS2803, CS8812B, WS2811, WS2818, UCS1903, TM1814, TM1914, TM1812, CS8208, CS6816, CS6814
IC Specification Download
LEDs Density
LED density refers to the number of LEDs by one meter of addressable LED strips. The higher the LED density, the more uniform light, the higher brightness, and no light spots.
Pixels Per Meter
This is a key factor in determining the resolution of your lighting effects. More pixels per meter allow for finer control and more detailed animations or color transitions.
IP Grade
IP Code or Ingress Protection Code is defined in IEC 60529 which classifies and rates the degree of protection provided by mechanical casings and electrical enclosures against intrusion, dust, accidental contact, and water. It is published in the European Union by CENELEC as EN 60529.
If you need to install addressable LED strips outdoors, you need to use IP65 or higher IP grade addressable LED strips. However, for installations that are submerged in water for short periods, IP67 or even IP68 would be safer.
PCB Width
Check the width of the PCB. This is particularly important if you’re installing the strip in a specific profile or channel. Ensure the strip fits comfortably within the space, allowing for heat dissipation and bending around corners if needed.
By carefully assessing each of these factors, you can choose an addressable LED strip that not only fits your project’s technical requirements but also brings your creative visions to life with vibrant colors and dynamic effects. For more information, please check What LED Strip Widths Are Available?
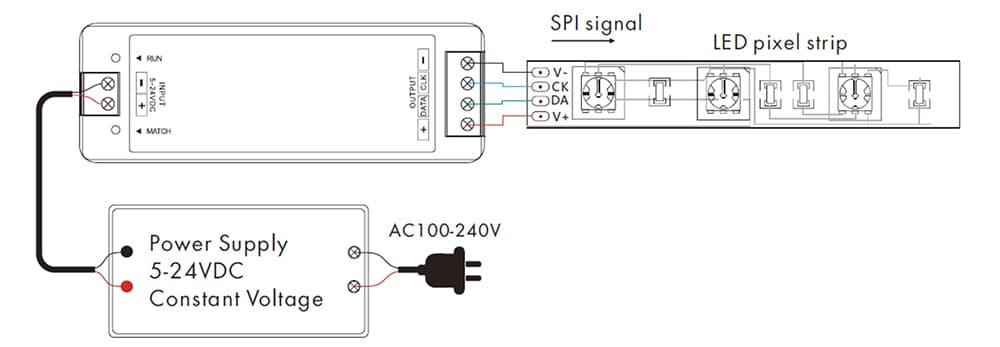
How To Wire an Addressable LED Strip?
Before controlling the DMX512 addressable led strip, you need to use the ‘address writer’ provided by the IC manufacturer to set the dmx512 address into DMX512 ICs. You only need to set the dmx512 address once, and the DMX512 IC will save the data, even if the power is turned off. Please check the how to set dmx512 address video below:
But, the SPI addressable led strip does not need to set the address before use.
SPI addressable led strips will have different outlets wire according to different functions, and their wiring diagrams will also be different.
Addressable led strip without breakpoint resume function, only has data channel.
The addressable led strip with the resumable transmission function will have a data channel and a spare data channel.
Addressable led strip with clock channel function have a data channel and a clock channel.
The data channel is generally represented by the letter D on the PCB, the spare data channel is represented by the letter B, and the clock channel is represented by the letter C.
SPI built-in IC addressable led strip
SPI external IC addressable led strip
With clock channel SPI IC addressable led strip
With break resume transmission function SPI IC addressable led strip
Wiring an addressable LED strip correctly is crucial for ensuring that it operates as intended, displaying a wide array of colors and effects with precision control. Here’s a step-by-step guide to wiring your addressable LED strip:
- Understand the Wiring Diagram: Most addressable LED strips will have at least three connections: V+ (power), GND (ground), and DATA (data signal). It’s essential to familiarize yourself with the strip’s wiring diagram, often provided by the manufacturer, to understand how to connect these correctly.
- Prepare Your Power Supply: Ensure that your power supply matches the voltage requirements of the LED strip (commonly 5V or 12V) and can provide enough current for the length of strip you are using. It’s also important to consider the power demands of your entire setup to prevent overloading.
- Connect the Data Controller: The data controller, or LED controller, is what sends commands to your LED strip, telling it which colors to display and when. Connect the data output from your controller to the data input on your LED strip. If your controller and LED strip have different connectors, you may need to solder wires directly to the strip or use a compatible adapter.
- Supply Power: Connect the V+ and GND wires from your power supply to the corresponding inputs on your LED strip. In some cases, these power connections will also need to go through the LED controller. Ensure that all connections are secure and correctly matched to avoid short circuits.
- Test Your Connections: Before finalizing your setup, it’s wise to test the connections by powering on the LED strip. This allows you to identify and correct any issues before completing the installation. If the strip doesn’t light up or displays incorrect colors, double-check your wiring against the strip’s and controller’s documentation.
- Addressing and Programming: With everything connected and powered, the final step is to address and program your LED strip using the controller. This might involve setting the number of LEDs, choosing color patterns, or inputting more complex sequences for specific effects.
Wiring an addressable LED strip requires careful attention to detail and adherence to the manufacturer’s guidelines. A correct setup will ensure that your LED strip functions beautifully, providing the customizable lighting effects that addressable LEDs are celebrated for.
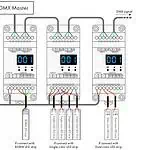
DMX512 Addressable led strip wiring diagram
Click here to check the high quality PDF DMX512 wiring diagram
SPI Addressable led strip with only data channel wiring diagram

SPI Addressable led strip with only data channel and clock channel
SPI Addressable led strip with only data channel and break resume channel
For more information, please check How to Wire LED Strip Lights(Diagram Included).
Can You Cut Addressable LED Strips?
One of the great features of addressable LED strips is their flexibility, not just in terms of lighting options but also in physical customization. Yes, you can cut addressable LED strips, but there are a few important considerations to keep in mind to ensure the functionality of the strip is maintained post-customization.
Addressable LED strips typically come with designated cutting points, marked by a line and sometimes scissors icons along the strip. These points are spaced according to the strip’s circuit design, usually every few centimeters, and allow you to shorten the strip without damaging the components or interrupting the circuit. Cutting the strip at these points ensures that each segment retains its ability to be individually controlled.
However, once cut, the newly created end of the strip may require additional steps to be usable again, such as soldering new connections or attaching a connector. It’s crucial to be precise and cautious when cutting and preparing the ends for reconnection, as improper handling can damage the LEDs or ICs.
Moreover, it’s essential to consider the power requirements of the modified strip. Shortening the strip reduces its power consumption, but if you plan to reconnect cut segments or extend the strip, ensure the power supply and controller can handle the added length. Always refer to the manufacturer’s guidelines for maximum strip length per power unit to avoid overloading the system.
In summary, while addressable LED strips offer the convenience of being customizable in length, careful attention must be paid to cutting, reconnecting, and power management to maintain the strip’s functionality and longevity. For more information, please check Can You Cut LED Strip Lights and How To Connect: Full Guide.
How Do You Connect Addressable LED Strips?
Connecting addressable LED strips is a straightforward process that involves a few key steps to ensure a successful setup. Whether you’re extending your lighting project or integrating the strip into a larger system, understanding these steps is crucial.
- Identify the Input and Output Ends: Addressable LED strips have designated input and output ends. The input end is where you connect your power supply and controller to send data to the LEDs. It’s essential to connect the strip in the correct direction to ensure the LEDs receive the correct signals.
- Use Connectors or Soldering: For a quick and easy connection, especially for temporary setups or those that might need adjusting, using specially designed connectors for addressable LED strips is advisable. These connectors often clip onto the end of the strip, making a secure connection without the need for soldering. For a more permanent and reliable connection, soldering wires directly to the strip’s designated pads is the best approach. This method requires some skill and equipment but results in a more durable and stable connection.
- Connecting Multiple Strips: If your project requires extending the LED strip beyond its original length, you can connect multiple strips together. Ensure that the data, power, and ground connections are correctly aligned between each strip. Using connectors or soldering, you can join the strips, paying close attention to maintaining the correct sequence and orientation.
- Power Supply and Controller Connection: Finally, connect the input end of your LED strip to a compatible controller, which in turn connects to a suitable power supply. The controller allows you to program and control the lighting effects, while the power supply provides the necessary electricity to light up the LEDs. Ensure that the power supply is rated for the total power consumption of your LED strip(s) to prevent overheating or damage.
It’s crucial to follow the manufacturer’s instructions for connecting and powering your addressable LED strips. Incorrect connections can lead to malfunctions, reduced lifespan of the LEDs, or even safety hazards. With the right approach and attention to detail, connecting addressable LED strips can be a seamless and rewarding part of your lighting project.
How To Install Addressable LED Strips?
Installing addressable LED strips involves more than just connecting wires; it’s about integrating these dynamic lights into your desired space effectively and aesthetically. Here are steps and tips to ensure a smooth installation process:
Planning Your Layout
- Measure Your Space: Before purchasing your LED strip, measure the area where you intend to install it. Consider corners, curves, and any obstacles that might affect the strip’s placement.
- Decide on the LED Density and Brightness: Depending on your project’s needs, choose an LED strip with the right density (LEDs per meter) and brightness. Higher density strips offer more uniform light with less spotting.
- Power Requirements: Calculate the total power consumption of your LED strip to select the appropriate power supply. Ensure it can handle the strip’s total length without overloading.
Preparing for Installation
- Clean the Surface: The adhesive backing on LED strips sticks best to clean, dry surfaces. Wipe down the area with alcohol to remove any dust or grease.
- Test the LED Strip: Before adhering it to the surface, connect the LED strip to the power supply and controller to ensure it works correctly.
Installing the LED Strip
- Remove the Adhesive Backing: Carefully peel off the adhesive backing from the strip, starting at one end. Avoid touching the adhesive with your fingers to maintain its stickiness.
- Adhere to the Surface: Stick the LED strip to the surface, pressing firmly along its length. For corners or curves, gently bend the strip without kinking it. If your strip isn’t adhesive-backed, use clips or mounting brackets designed for LED strips.
- Connect to Power and Controller: Once the strip is in place, connect it to the power supply and controller as previously tested. Secure any loose wires with clips or ties to keep them neat and safe.
Programming and Testing
- Program Your Effects: Use the controller to program the desired lighting effects, colors, and animations. Many controllers offer pre-programmed options or allow custom programming.
- Final Testing: With everything installed and programmed, do a final test to check that the strip lights up as expected and that all connections are secure.
Special Installations
How To Install ASUS ROG Addressable LED Strip?
- For gaming setups, ensure compatibility with your motherboard’s RGB software (e.g., ASUS Aura Sync) for seamless integration.
- Follow the specific instructions for connecting the strip to the motherboard’s RGB header, and use the software to synchronize lighting effects with your gaming hardware.
How To Install An Addressable LED Strip To The Motherboard?
- Identify the motherboard’s addressable RGB header, usually marked as “ARGB” or “ADD_HEADER.”
- Connect the strip’s connector to the header, ensuring the alignment of voltage, ground, and data pins according to the motherboard’s manual.
- Use the motherboard’s RGB software to control and customize the strip’s lighting effects.
Installing addressable LED strips can elevate the aesthetics of any space, adding both functionality and flair. With careful planning, precise installation, and creative programming, you can transform any area into a vibrant, dynamic environment.
How To Control An Addressable LED Strip?
Controlling an addressable LED strip opens up a world of possibilities for creating dynamic, colorful lighting effects. Here’s how you can take command of this versatile lighting solution:
- Choose a Control Method: There are several ways to control addressable LED strips, including using a standalone LED controller, a microcontroller (like Arduino or Raspberry Pi), or a computer with appropriate software. The choice depends on the complexity of the effects you want to achieve and your comfort level with programming.
- Standalone LED Controllers: These are user-friendly devices that come with pre-programmed effects and, in some cases, remote controls. They are a great choice for simple projects where ease of use is a priority.
- Microcontrollers: For those who want more customization, microcontrollers like Arduino offer the flexibility to program your own lighting effects. You can write code to control the color, brightness, and patterns of the LEDs, and even react to external inputs like sound or temperature.
- Software Solutions: Some addressable LED strips can be controlled via software on a computer or smartphone. This option often provides a user-friendly interface for creating and managing lighting effects, making it accessible for those without programming skills.
- Wiring and Setup: Regardless of the control method, you will need to connect your LED strip to the controller and power source correctly. Ensure the data, power, and ground connections are secure and match the controller’s specifications.
- Programming and Customization: If you’re using a microcontroller or software solution, you’ll have the opportunity to program custom lighting effects. This can range from simple color changes to complex animations synced with music or other media.
- Testing: Always test your setup before finalizing your installation. This helps identify any issues with wiring, power, or programming and allows you to make adjustments as needed.
Controlling an addressable LED strip gives you the creative freedom to tailor lighting effects to your exact preferences. Whether you’re lighting up a room, adding flair to a project, or setting the mood for an event, the right control method can help you achieve stunning results with ease.
How To Program Addressable LED Strip?
Programming an addressable LED strip allows you to customize its lighting patterns, colors, and animations to fit your specific needs and preferences. Here’s a basic guide to get you started with programming your LED strip, focusing on using a popular microcontroller like Arduino for control:
- Choose Your Development Environment: For Arduino, the Arduino IDE is a widely used platform for writing and uploading code to the board. Ensure it’s installed on your computer and that you have the necessary drivers for your microcontroller.
- Connect Your LED Strip to the Microcontroller: Typically, you’ll need to connect the data input of your LED strip to one of the digital I/O pins on the Arduino. Also, connect the power (V+) and ground (GND) pins of the LED strip to a suitable power source, making sure the power supply matches the strip’s voltage requirements and can handle the current draw.
- Install Necessary Libraries: Many addressable LED strips, like those using the WS2812B chip, can be controlled using the Adafruit NeoPixel library. This library simplifies the coding process, allowing you to easily define colors and animations. Download and install this library through the Arduino IDE’s Library Manager.
- Write Your Program: Open the Arduino IDE and start a new sketch. Begin by including the NeoPixel library at the top of your sketch. Initialize the LED strip by specifying the number of LEDs, the Arduino pin connected to the strip, and the type of strip (e.g., NeoPixel, WS2812B). In the setup function, initialize the strip and set its brightness if needed.
- Define Your Lighting Effects: Use the functions provided by the NeoPixel library to create effects. For example, you can set individual LEDs to specific colors, create gradients, or develop custom animations. Loop these effects in the main program loop or create functions for specific patterns you want to trigger.
- Upload Your Program: Once you’ve written your program, connect your Arduino to your computer via USB, select the correct board and port in the Arduino IDE, and upload your sketch to the board.
- Test and Iterate: After uploading, your LED strip should display the programmed effects. Test your setup thoroughly, making adjustments to the code as needed to refine your animations and effects.
Programming addressable LED strips with Arduino offers endless creativity, allowing you to tailor lighting to your exact specifications, whether it’s for mood lighting, notifications, or interactive installations. With practice, you can develop increasingly complex and beautiful lighting displays.
How To Program Addressable LED Strip With PI?
Programming an addressable LED strip with a Raspberry Pi opens up a plethora of possibilities for creating dynamic and interactive lighting projects. The process involves a bit of setup and some coding, but it’s an incredibly rewarding experience. Here’s how to get started:
- Prepare Your Raspberry Pi: Ensure your Raspberry Pi is set up with the latest version of its operating system and that you have internet access. It’s also a good idea to perform any available updates and upgrades by running sudo apt-get update and sudo apt-get upgrade in the terminal.
- Connect the LED Strip: Identify the data, power, and ground wires on your LED strip. Connect the ground wire to one of the Raspberry Pi’s ground pins, and connect the data wire to a GPIO pin. Remember, you’ll need an external power source that matches the voltage requirement of your LED strip, as the Raspberry Pi cannot power many LEDs directly. Connect the power wire of the LED strip to the positive terminal of your power supply and ensure the ground from the power supply is also connected to the Raspberry Pi’s ground.
- Install Required Libraries: To control the LED strip, you’ll need to install a library that supports the communication protocol of your strip (e.g., the rpi_ws281x library for WS2812B LEDs). You can install this library by cloning its GitHub repository and following the installation instructions provided.
- Write Your Script: Using your preferred text editor or development environment on the Raspberry Pi, write a Python script to control the LED strip. Begin by importing the necessary library and initializing the LED strip with parameters like the number of LEDs, the GPIO pin connected to the data line, and the brightness level.
- Programming the Effects: Utilize the functions provided by the library to set the color and brightness of individual LEDs or create patterns and animations. The library typically offers functions to set the color of each LED individually, allowing you to loop through the LEDs and assign colors to create gradients, patterns, or even respond to external inputs.
- Run Your Script: Save your script and run it using Python. If everything is set up correctly, your LED strip should light up according to the patterns you’ve programmed. You might need to adjust your script and experiment with different effects to achieve your desired outcome.
- Experiment and Expand: Once you’re comfortable with the basics, consider integrating sensors, web services, or other inputs to make your lighting setup interactive. The Raspberry Pi’s connectivity and processing power make it ideal for complex projects that go beyond simple lighting effects.
Programming an addressable LED strip with a Raspberry Pi requires some initial setup but offers a flexible and powerful platform for creating sophisticated lighting projects. With the ability to integrate with various inputs and services, your lighting projects can become as interactive and dynamic as your imagination allows.
How To Program Addressable LED Strip in Mplab?
Programming addressable LED strips in MPLAB, Microchip’s integrated development environment (IDE) for their microcontrollers, involves using specific microcontroller units (MCUs) capable of handling the digital signal communication required for controlling the LEDs. This guide outlines the basics of setting up a project in MPLAB to control an addressable LED strip, such as those using the WS2812B LEDs, with a Microchip MCU.
- Setup Your MPLAB Project:
- Launch MPLAB X IDE and create a new project by selecting the specific Microchip MCU you are using. Ensure that you have the necessary compiler installed (e.g., XC8 for 8-bit microcontrollers).
- Configure your project settings according to your hardware setup and the MCU you’re using.
- Include Necessary Libraries:
- Depending on your LED strip’s protocol (e.g., WS2812B), you may need to write your own control routines or find existing libraries that support these LEDs.
- Libraries or example codes for controlling WS2812B LEDs with Microchip MCUs can sometimes be found in Microchip’s code examples or on various online forums and repositories.
- Initialize the MCU’s Peripherals:
- Use MPLAB’s Code Configurator (MCC) tool, if available for your MCU, to easily set up the clock, I/O pins, and any other peripherals you’ll be using. For controlling addressable LEDs, you’ll primarily be concerned with setting up a digital output pin to send data to the LED strip.
- Write Your Control Code:
- Write code to generate the precise timing signals required by the LED strip’s protocol. This often involves bit-banging a GPIO pin with very specific timing to encode color data for each LED.
- Implement functions to set individual LED colors, create patterns, or animations. You’ll need to manage the timing and data transmission carefully to ensure reliable control of the LEDs.
- Test and Debug:
- After writing your code, compile it and upload it to your Microchip MCU using a programmer/debugger supported by MPLAB, such as the PICkit or ICD series.
- Test the functionality with your LED strip, and use MPLAB’s debugging tools to troubleshoot any issues with timing or data transmission.
- Iterate and Expand:
- Once you have basic control over the LED strip, you can expand your project by adding more complex animations, integrating sensor inputs, or even implementing wireless control.
Programming addressable LED strips with MPLAB and Microchip MCUs offers a robust and scalable approach to creating custom lighting solutions. While it requires a more in-depth understanding of the MCU’s operation and the LED protocol, it allows for highly optimized and efficient control suitable for both hobbyist projects and professional applications.
How To Assign An Addressable LED Strip?
Assigning an addressable LED strip typically involves specifying the individual LEDs’ addresses within your control software or firmware, enabling precise control over each LED’s color and brightness. This process can vary depending on the control platform (e.g., Arduino, Raspberry Pi, or a commercial LED controller), but the underlying principle remains consistent. Here’s a general approach:
- Understand Your LED Strip Protocol: Different addressable LED strips use various protocols (e.g., WS2812B, APA102). Understanding the protocol is crucial as it dictates how data is transmitted to each LED.
- Determine the Number of LEDs: Count or refer to the manufacturer’s specifications to determine the total number of individually addressable LEDs on your strip.
- Initialization in Your Code: When writing your program (for example, in Arduino or Raspberry Pi), you’ll typically start by initializing the LED strip in your setup. This includes defining the total number of LEDs and the data pin connected to the strip. For libraries like Adafruit NeoPixel for Arduino, this would involve creating a NeoPixel object with these parameters.
- Assign Addresses to Each LED: In your program, each LED is addressed by its position in the sequence, starting from 0. For instance, the first LED on the strip is addressed as 0, the second as 1, and so on. When you command an LED to change color or brightness, you refer to it by this address.
- Programming LED Behavior: Use loops or functions in your code to assign colors and effects to specific LEDs. For example, to create a chase effect, you could write a loop that lights up each LED in sequence by incrementally addressing them.
- Advanced Address Assignment: For complex installations or larger projects involving multiple LED strips or matrices, you might need to map out a more complex addressing scheme. This can involve calculating LED addresses based on their physical positions or integrating multiple strips into a cohesive system.
- Testing: Always test your addressing scheme with simple patterns to ensure each LED responds correctly. This step is crucial for identifying and correcting any addressing errors.
Assigning addresses to an LED strip allows for intricate control over lighting patterns and animations, making it a fundamental aspect of working with addressable LEDs. Whether you’re creating a simple decorative setup or a complex interactive display, proper address assignment is key to achieving your desired lighting effects.
How To Make Addressable RGB LED Strip Light Up Without Control?
Lighting up an addressable RGB LED strip without a traditional controller involves using a simple power source and potentially a microcontroller or a basic circuit to send the necessary signals to the strip. While you won’t have the full range of programmable features and animations, you can still illuminate the strip or achieve basic effects. Here’s how:
- Using a Basic Power Supply:
- If you just want to test the LEDs for basic functionality (i.e., seeing if they light up), you can connect the strip’s power and ground wires to a suitable power supply matching the strip’s voltage requirements (commonly 5V or 12V). Note that without a data signal, the LEDs will not light up in most addressable strips, as they require digital instructions to operate.
- Utilizing a Simple Microcontroller Setup:
- For a minimal control setup, you can use a microcontroller like an Arduino with a single line of code to send a basic command to the strip. By initializing the strip in your code and setting all LEDs to a specific color (e.g., using a library like Adafruit NeoPixel), you can light up the strip without complex programming.
- Example code snippet for Arduino:
#include <Adafruit_NeoPixel.h>
#define PIN 6 // The data pin the strip is connected to
#define NUM_LEDS 60 // Number of LEDs in the strip
Adafruit_NeoPixel strip = Adafruit_NeoPixel(NUM_LEDS, PIN, NEO_GRB + NEO_KHZ800);
void setup() {
strip.begin();
strip.show(); // Initialize all pixels to ‘off’
strip.fill(strip.Color(255, 0, 0), 0, NUM_LEDS); // Set all pixels to red
strip.show();
}
void loop() {
// No need to do anything here for a static display
}
- This code initializes the strip and sets all LEDs to red. You’ll need to connect your Arduino to the LED strip’s data, power, and ground accordingly.
- Using a Pre-Programmed LED Controller:
- For those without a microcontroller or coding knowledge, a pre-programmed LED controller can be an alternative. These controllers come with basic functions and effects and can be connected directly to the LED strip. While not entirely without control, they offer a plug-and-play solution with minimal setup.
While these methods can make an addressable RGB LED strip light up without sophisticated control, the beauty of addressable strips lies in their programmability and the dynamic effects that can be achieved with proper controllers and software. These approaches are best suited for testing, simple projects, or when you need a quick setup without detailed customization.
How To Customize Addressable LED strips For Your Lighting Projects?
Customizing addressable LED strips for your lighting projects allows you to create personalized lighting effects that can enhance the atmosphere of any space. Here’s how to bring your creative ideas to life:
- Define Your Project Goals:
- Start by outlining what you want to achieve with your lighting project. Consider the mood, themes, or specific effects you wish to create, such as dynamic backlit panels, interactive art installations, or ambient room lighting.
- Select the Right Type of LED Strip:
- Choose an addressable LED strip that suits your project’s needs, considering factors like color options (RGB or RGBW), voltage, LED density, and waterproof rating if required.
- Plan Your Installation:
- Sketch out where the LED strips will be placed. Measure the lengths accurately and consider where you’ll need to make cuts and connections. Plan for the placement of the controller and power supply as well.
- Use a Suitable Controller:
- Pick a controller that can handle the complexity of your lighting effects. Microcontrollers like Arduino or Raspberry Pi offer flexibility for custom programming, while dedicated LED controllers can provide ease of use with pre-set or programmable patterns.
- Develop Custom Lighting Effects:
- If using a microcontroller, write or modify code to create your desired lighting effects. Utilize libraries like FastLED (for Arduino) or rpi_ws281x (for Raspberry Pi) to simplify the programming process.
- For simpler setups, explore the programming options available with your LED controller. Many allow for custom sequencing, color selection, and effect timing.
- Integrate with Other Systems (Optional):
- Consider integrating your LED strip with other systems for interactive effects. This could include connecting to sensors, smart home devices, or music systems for responsive lighting that changes with the environment or sound.
- Test and Iterate:
- Always test your setup as you go, especially after making any changes or additions. This allows you to troubleshoot issues and refine your effects for the best outcome.
- Install and Enjoy:
- Once you’re satisfied with your custom programming and setup, complete the installation of your LED strips. Securely mount the strips and conceal wiring for a clean look. Then, enjoy the dynamic lighting you’ve created.
Customizing addressable LED strips for your lighting projects not only enhances the visual appeal but also allows for a high degree of personalization. Whether you’re creating a subtle ambiance or a vibrant display, the key is in planning your project thoroughly and experimenting with different effects to achieve the desired result.
Where To Buy Addressable LED Strip?
Finding the right place to buy addressable LED strips involves considering a range of options, from local electronics stores to various online platforms. Here’s a guide to help you locate the best sources for your project needs:
Online Retailers
- Amazon, eBay, and AliExpress: These platforms offer a wide selection of addressable LED strips with various specifications, including different lengths, LED densities, and IP ratings for water resistance. They are convenient for browsing a broad range of products and finding competitive prices.
Specialty Electronics and DIY Stores
- Adafruit and SparkFun: Known for catering to DIY electronics enthusiasts, these stores not only sell addressable LED strips but also provide valuable resources, tutorials, and customer support to help with your projects.
Direct From Manufacturers
- Alibaba and Global Sources: If you’re looking to buy in bulk or want to find the manufacturer of a specific type of LED strip, these platforms can connect you directly with suppliers. However, minimum order quantities and shipping considerations are important factors when ordering this way.
Local Electronics Stores
- While they might not have as extensive a selection as online retailers, local electronics stores can be a good option for quick purchases or when you want to see the product before buying. They may also offer helpful advice and recommendations.
Maker and Hobbyist Shops
- Local maker fairs, hobbyist shops, or electronics markets: These venues can be excellent sources for finding addressable LED strips, especially if you’re looking for something specific or need expert advice on your project.
Considerations When Buying
- Quality and Reliability: Read reviews and check ratings to assess the quality and reliability of the LED strips and the seller.
- Compatibility: Ensure that the LED strip is compatible with your controller and power supply, especially if you’re integrating it into a larger system.
- Warranty and Support: Look for sellers who offer warranties or return policies, and who provide good customer support in case you encounter issues with your purchase.
Wherever you decide to buy your addressable LED strip, doing a bit of research and comparing options can help you find the best deal and ensure that the product meets your project’s needs. Online forums, project galleries, and reviews can also offer insights into how well a particular LED strip performs in real-world applications.
Troubleshooting Addressable LED Strips
Encountering issues with addressable LED strips can be frustrating, but most problems are common and can be solved with some troubleshooting steps. Here’s how to address the most frequent issues:
LEDs Not Lighting Up
- Check Power Supply: Ensure the power supply is properly connected and provides the correct voltage and sufficient current for your LED strip.
- Inspect Connections: Verify that all connections, including power, ground, and data, are secure and correctly oriented.
- Data Signal Issues: Ensure the data signal is connected to the right pin on your controller and that the controller is functioning properly.
Incorrect Colors or Patterns
- Verify Programming: Double-check your code or controller settings to ensure the correct commands are being sent to the LED strip.
- Check LED Order: Some strips use a different order of color channels (e.g., GRB instead of RGB). Adjust your code or controller settings accordingly.
Flickering or Unstable Operation
- Power Stability: Flickering can indicate power supply issues. Ensure your power supply can handle the strip’s maximum current draw and consider adding a capacitor across the power and ground near the strip to smooth out power fluctuations.
- Signal Integrity: Long data lines or poor connections can degrade the data signal. Keep data lines as short as possible and use a signal repeater or amplifier for long runs.
Partially Lit or Dead Sections
- Physical Damage: Inspect the strip for any cuts, kinks, or damage that might interrupt the circuit. If a section is damaged, it may need to be removed or replaced.
- Loose Connections: Ensure all soldered or clipped connections are secure. A loose data connection can prevent downstream LEDs from receiving data.
Overheating
- Check Load and Ventilation: Ensure your LED strip is not overloaded and that there is adequate ventilation around it. Overheating can shorten the lifespan of LEDs and cause color shifts or failure.
General Tips
- Start Simple: If you’re having trouble, simplify your setup. Test with a shorter strip or fewer animations to isolate the issue.
- Firmware/Software Updates: Ensure your controller’s firmware or software is up to date, as updates can fix known issues or improve performance.
- Consult Documentation: Refer to the manufacturer’s documentation or support forums for specific troubleshooting tips related to your LED strip model.
Troubleshooting addressable LED strips often involves methodically checking each component of your setup—from power supply to programming. By isolating and addressing each potential issue, you can resolve common problems and get your LED project back on track.
WS2811 Vs WS2812 Vs WS2813
The WS2811, WS2812, and WS2813 are widely recognized in the realm of addressable LEDs, each offering unique advantages for various applications.
- WS2811: This external IC chipset is versatile, supporting both 12V and 5V power supplies. It’s known for controlling separate LED modules, making it suitable for projects where flexibility in LED placement and wiring is needed. The WS2811 allows for extensive customization but requires more complex wiring and setup.
- WS2812: The WS2812 integrates the control circuit and RGB chip into a single 5050 component, simplifying the design and reducing the footprint on LED strips. Operating on 5V, it offers high brightness and color accuracy, making it a favorite for compact and densely packed LED arrays. However, its integration means any failure requires replacing the entire LED.
- WS2813: An upgrade to the WS2812, the WS2813 adds a backup data line, significantly enhancing reliability. If one LED fails, the signal can still pass through to the rest of the strip, preventing the entire array from being affected. This feature makes WS2813 ideal for critical applications where continuous operation is paramount.
For more information, please check WS2811 VS WS2812B and WS2812B VS WS2813.
SK6812 VS WS2812B
The SK6812 and WS2812B chipsets are often compared due to their similarities in functionality and form factor.
- SK6812: Similar to the WS2812B, the SK6812 also integrates the control IC and LEDs. A notable advantage is its support for an additional white LED (RGBW), offering a broader color spectrum and the ability to produce pure white tones. This makes the SK6812 particularly appealing for applications requiring nuanced color mixing or accurate white light.
- WS2812B: The WS2812B is an evolution of the WS2812, offering improved timing protocol and greater brightness. While it lacks the integrated white LED found in the SK6812, its reliability and color consistency make it a staple in LED projects. The WS2812B’s robust ecosystem and widespread adoption provide extensive support and resources for developers.
SK9822 vs APA102
When it comes to LED strips that require high-speed data transmission and precise color control, the SK9822 and APA102 are top contenders.
- SK9822: The SK9822 is known for its high PWM frequency, which minimizes flicker and is ideal for video applications. It operates with separate data and clock lines, ensuring stable signal transmission even at high speeds. This makes the SK9822 suitable for projects requiring dynamic effects and animations.
- APA102: The APA102 chipset shares many features with the SK9822, including separate data and clock lines for reliable high-speed data transmission. What sets the APA102 apart is its global brightness control feature, allowing for more nuanced brightness adjustments without compromising color integrity. This capability is especially beneficial for applications where precise lighting control is needed.
FAQs
Conclusion
Addressable LED strips offer a versatile and dynamic lighting solution for a wide range of applications, from home decor to professional installations. With the ability to control each LED individually, users can create intricate patterns, animations, and effects that are limited only by imagination. Whether you’re a hobbyist looking to add a personal touch to your space or a professional seeking sophisticated lighting solutions, addressable LED strips provide the flexibility and control needed to bring your vision to life.
Remember, the key to a successful LED strip project lies in careful planning, from selecting the right type of strip and controller to understanding the power requirements and installation process. With the wealth of resources available online, including tutorials, forums, and product guides, even those new to working with addressable LED strips can achieve impressive results.
As technology continues to evolve, we can expect addressable LED strips to become even more accessible and feature-rich, offering even greater possibilities for customization and creativity. Whether you’re lighting up a single room or designing an elaborate light show, addressable LED strips are a powerful tool in any creator’s arsenal.