LED strips are the most popular option in the modern lighting industry. These LED strips are especially famous for DIY, thanks to their flexibility and versatility. They usually come in a reel of 5 meters (standard size but can vary) that you can size as per your requirements. And regarding this sizing, the most common question is- can you cut the LED strip light? And how to reconnect them after cutting?
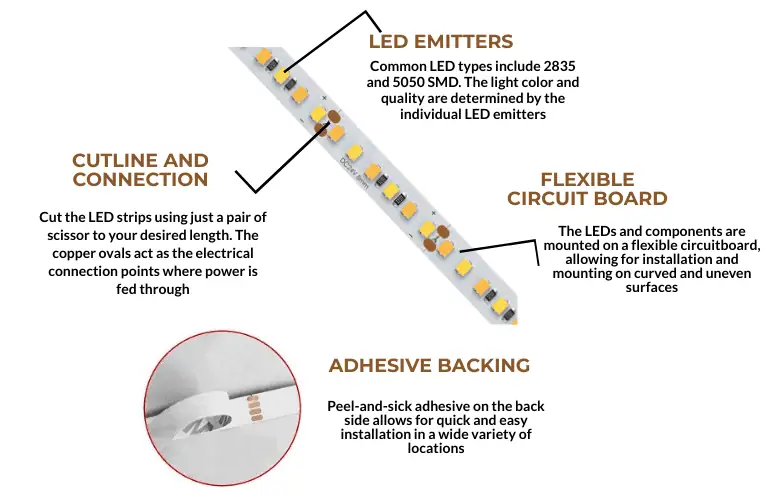
The LED strip’s PCB has some copper dot earmarks followed by a scissor icon. These scissor icons indicate cut points of the LED strip. Basically, this is the section where one circuit ends and the other begins. So, cutting at this point is totally safe and will not damage the LED strips. However, there are also options for reconnecting the strips using LED strip connectors or soldering.
But are all LED strips cuttable? Or are all strip connectors suitable for every type of LED strip? Perhaps, a thousand questions like these are knocking on your mind. No worries, this article will solve all your doubts. Here I have covered a detailed discussion on the cutting & reconnecting process of LED strips, troubleshooting for strip cutting, and more. So, without any further delay, let’s get into the discussion-
What Is LED Strip Light?
LED strip lights are super flexible printed circuit boards (PCB) where surface-mounted LEDs are populated in an organized pattern. These strips are often called LED tape or ribbon for their rope-like structure. LED strips usually come with an adhesive backing allowing you to install them evenly on the surface. Plus, these are popular for their durability, energy efficiency, brightness, and versatile coloring options.
The most impressive fact about these LED strips is their customizability. You can give life to your DIY lighting ideas with these strips. Additionally, you will find a wide range of lighting variations with them, including RGB, tunable white, addressable LED strips, and more. And they are also ideal for lighting up your bedroom, bathroom, kitchen, office, or outdoor lighting. Besides, sizing these LED strips is super easy. Thanks to the cut marks that make it possible to size the strips to your desired length.
Can You Cut LED Strip Lights?
Usually, LED strips come in a 5-meter reel. But what if your requirement is just 1 or 2 meters? No, worries. LED strips have cut marks in their circuit board, allowing you to size them to your required measurement. These markings are placed where one circuit ends and the other begins. Following these marks, you can quickly cut the LED strips using scissors. But all types of LED strips are not cuttable. You can only cut the strips with cut marks in them.
But how to identify the cut marks? Finding the cut marks is super easy. You will notice scissor icons within the LED strips. A pair of copper dots usually earmark these markings at the end of the circuit. All these dots and scissor icons indicate that cutting the strip on those points will not damage the LED. So, if you need to shorten the length of the strips, cut the strips to your desired size following the cut mark icons. But, cutting the strips at the wrong place will damage the circuit, and the LEDs will not glow. So, be careful while cutting the strips. However, don’t worry; this article will guide you in cutting LED strips like a pro; keep reading.
Factors To Consider Before Cutting LED Strips
Cutting LED strips may seem very simple. But a wrong cut can desecrate the circuit causing permanent damage to the lighting. So, to cut the LED strips perfectly, here are the factors that you should keep in mind-
- Cutting Points
When cutting an LED strip, the cut points are the first thing to look for. You will find a thin line and a pair of metallic solder points on either side of the LED strip, indicating the cut points. These metallic points are followed by a scissor icon, ensuring it is the spot to cut. Usually, these cut markings are found in every 3 LEDs(12V). However, the spacing between the cut marks varies from brand to brand.
- Type Of LED Strips
From the above discussion, you already know LED strips are cuttable. But are all LED strips suitable for cutting? The answer is a big, No.
The LED strips controlled by individual or IC chips are unsuitable for cutting. For example- You can cut an RGB LED strip, but an RGBIC LED strip is not cuttable due to having IC chips in it. In this type of LED strip, IC chips are placed after every few diodes. They individually control the diodes allowing each section to show different colors along the LED strips. And so if you cut these strips, the circuit of the entire section will get damaged.
But how will you know if the strip is cuttable, or how to identify if it has IC chips? The answer is straightforward. Go for the scissor mark. The strips that have scissor marks are ideal for cutting. And for the ones that don’t have markings, avoid cutting them.
- Cutting Tools
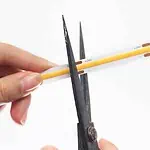
Cutting the LED strips doesn’t necessarily require specialized equipment. You can simply cut them with regular scissors or a sharp blade. But if the cut runs through the circuit, it will hamper the lighting of the strip. That is why an LED strip light cutter is better for staying in a safer zone. These have a scissor-like structure with stainless steel curve cutting blades. These blades ensure smooth cutting of the strips, lowering the chances of wrong cuts. So, use this tool to cut your LED strips like a pro.
How To Cut The LED Strips?
Cutting LED strips is not rocket science. Anyone can quickly cut the trips to size to their desired length. Here are the steps following which you can cut your strips accurately in the quickest time possible-
Step:1- Measure The Length
The first step to cutting your LED strip is to measure the length required for your lighting. For this, you can use measuring tape or simply place the LED strips on the installment’s surface to target the cutting point.
Spet:2- Find The Cutting Marks
After you have measured the required length, it’s time to cut the LED strips. For that, check the markings placed closer to your desired length. However, getting LED strips with more cutting marks is always better. This means there will be less gap between the cutting marks. And it will make your sizing more accurate. For example, the LED strips with cut marks after every three LEDs are more convenient to size than the ones with six LED cut mark intervals. Once you have set the cutting point, target for the scissor-making and get ready to cut.
Step 3- Cut With a Scissor
Now take a LED strip light cutter or a regular scissor with a sharp blade. Place the scissor between the metal soldering point, exactly where you will find the scissor icon. Ensure to place the cutter at the exact marking. Now, cut the strips. And thus, your strip is divided into two parts, where both sections work perfectly.
In this way, following these simple steps, you can quickly size your LED strips on your own without any professional help.
How To Connect The LED Strips?
After cutting the LED strips, you may sometimes find the length too short. In this case, you must reconnect them again to bring the appropriate size. Likewise, you can connect multiple strips when you need long strips for your installation. But how to do that?
In these situations, you can use two methods to connect the LED strips- use LED strip connectors or go for soldering. Here I have discussed the process of connecting LED strips both ways. Go through the steps and choose the procedure that you find most suitable-
Procedure:1- Using LED Strip Connectors:
LED strip connectors are the most convenient way to connect LED strips. These small connectors are designed to complete the electrical circuit between the strips making the LEDs glow. Thus it provides a quick solution with zero hassle of soldering. Here are the steps following which you can connect the LED strips like pro-
Step-1: Purchase the Right LED Strip Connectors
The first step for connecting the LED strip with the connector is purchasing the right one. All strip connectors are not suitable for every type of LED strip. For example- if you have a single-color LED strip, purchase a 2-pin LED strip connector. And if it’s an RGB LED strip, go for 4-pin connectors. Likewise, the requirement of connectors varies with the strip type. I’ll discuss this in detail in the latter half of the article, so continue reading. However, to purchase the best quality LED strip connectors, go for LEDYi. We have a wide range of LED strip connectors for different types and IP ratings. High Density and COB LED Strip Connectors are also available. So, check these out- LEDYi LED Strip Connector.
Step-2: Back Tape Peeling
Once you have the right strip connector, it’s time to get into the main work. Take the LED strips and tear a little portion of the 3M tape backing from the section you have already cut. If your strip is fresh and you still need to make cuts, look for the ending cut mark and cut the unit to peel off some adhesive tape. This peeling process ensures the LED strip properly sits when inserted into the connector.
Step-3: Place the LED Strip To The Connector
Take the connector and insert the ending point of both strips inside the connector. Ensure the positive (+) & negative (-) marking of the stripes matches that of the connector. Also, make sure the soldering pads completely enclose the joining metal.
Step-4: Cover The Connector
After inserting the LED strip into the connector, lock it with the plastic cover. Be gentle and ensure the cover is set perfectly. Also, double-check the positive (+) & negative (-) markings to ensure they are placed correctly. However, liquid tape or bonding material can make the connection more robust. It will keep the joint between the strips intact, minimizing the chances of getting loosened.
Procedure-2: Soldering
Soldering is the most reliable LED strip connecting method for long-lasting and critical connections. So, if you want a permanent and professional connection for your LED stirrups, follow the below soldering process-
Step-1: Peeling Adhesive from the Solder Pads
Take the LED strips and ensure the ends of both strips have a neat cut. Now carefully peel the 3M adhesive backing from the soldering pad of one of the LED strips. This strip with peeled backing will be on top when soldered.
Step-2: Heating & Applying Solder
Now, pre-tin the solder pads on the strip segment that will be placed beneath the other. Never heat the solder directly; always heat the target region. Once sufficient heat has been applied to the area, it’s time for soldering. You should apply solder to the heated area; avoid putting the soldier directly into the iron’s tip.
Step-3: Connecting The Strips
Next, align the non-tinned strip segment directly over the newly tinned pads and apply heat. Hold the soldering iron in place until the solder remelts and begins to flow. However, ensure the strip is not getting too hot, or the circuit cases may start to lift from the PCB substrate. This way, your strips will get connected together. Add a small portion of solder on the top of the pad to strengthen the connection. This will make the bond robust and improve the strip’s visual appeal.
Types Of LED Strip Connectors
LED strip connectors can be of many types depending on various categories, like- PINs, IP rating, function, etc. These varieties of LED strips connectors are as follows-
LED Strip Connectors Based On PINs
Depending on the PINs, LED strip connectors can be of the following types-
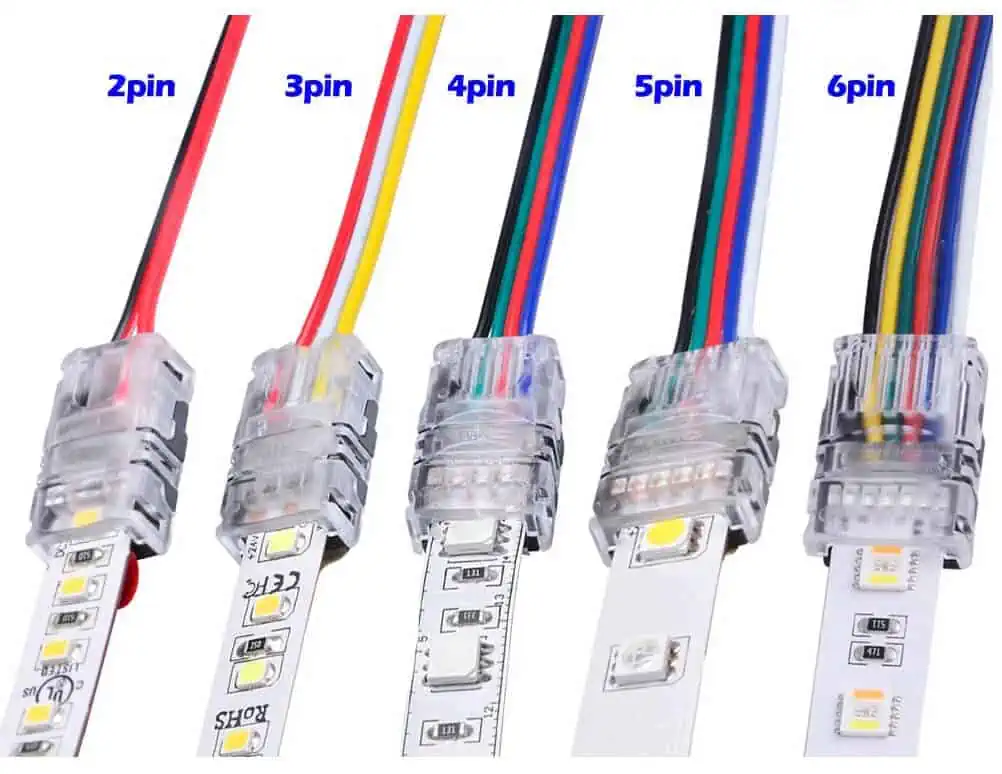
- 2 PINs LED strip connectors: These connectors are suitable for single-color or white-color LED strips. You can use these connectors with our LEDYi single-color LED strips. We have red, green, blue, yellow, amber, Pink, and UV colors on our single-color LED strips. However, we also provide OEM & ODM facilities. So, contact us if you need any customization.
- 3 PINs LED strip connectors: The LED strip connectors with three pins are compatible with CCT adjustable and dual color LED strips. These connectors are ideal if you have tunable white LED strips or addressable LED strips.
- 4 PINs LED strip connectors: RGB LED strips are compatible with 4 PINs LED strip connectors.
- 5 PINs LED strip connectors: These connectors connect RGB+W or RGBW LED strips.
- 6 PINs LED strip connectors: If you have RGB+CCT or RGB+Tunable white LED strips, you will require 6 PIN connectors to join the strips.
| No. of PINs For Strip Connectors | Type of LED Strips |
| 2 PINs | Single color LED strips. |
| 3 PINs | Tunable white LED strips & Addressable LED strips |
| 4 PINs | RGB LED strips |
| 5 PINs | RGB+W or RGBW LED strips |
| 6 PINs | RGB+CCT & RGB+Tunable white LED strips |
LED Strip Connectors Based On IP Number
IP rating stands for Ingress Progress. It determines the degree of protection against solid and liquid ingress. Based on this factor, LED strip connectors can be of the following types-
- IP20-Non-waterproof: These LED strip connectors are not waterproof. You can use them with lower IP-rated LED strips for indoor uses, like-bedroom living room, etc.
- IP52-Single Side Glue Coating: The dustproof LED strips with IP52 are compatible with these strip connectors. The height of these connectors is greater than the IP20 connectors, as they join the strips with a single side glue coat.
- IP65-Hollow Tube Waterproof: The LED strips with IP65 ratings are connected using this connector. They are dust and waterproof. So you can use them in the kitchen, bathroom, and eaves.
- IP67/IP68-Solid Tube Waterproof: If you are looking for a complete waterproof connector for your LED strips with IP67/68 ratings, solid tube waterproof strip connectors are best. They are totally sealed and will not let water enter the strips’ joining.
LED Strip Connectors Based On Structure & Function
Based on the structure & function, LED strips can be of the following types-
- COB LED strip connector: These LED strip connectors are suitable for COB LED strips. These are also known as beetle clip invisible connectors. You can go for our LEDYi COB LED strip connectors; they are transparent enough to complement the high-density lighting effect of the COB LED.
- LED Strip 90-Degree connector: An ‘L’ shaped connector is used to connect the strips in the corner or edges, known as a 90-degree connector. These small devices have an L-pattern structure with connectors at both ends. It allows you to join the two pieces of LED strips by inserting them into these two connectors. To learn the connection process of these connectors, check out this video – New L Shape Solderless Connector.
- Hippo-M LED Strip Connector: These professional and robust connectors support a wide range of LED strips. The perforated contact technology of these connectors makes the connection so simple and convenient.
LED Strip Connectors Based on PCB Width
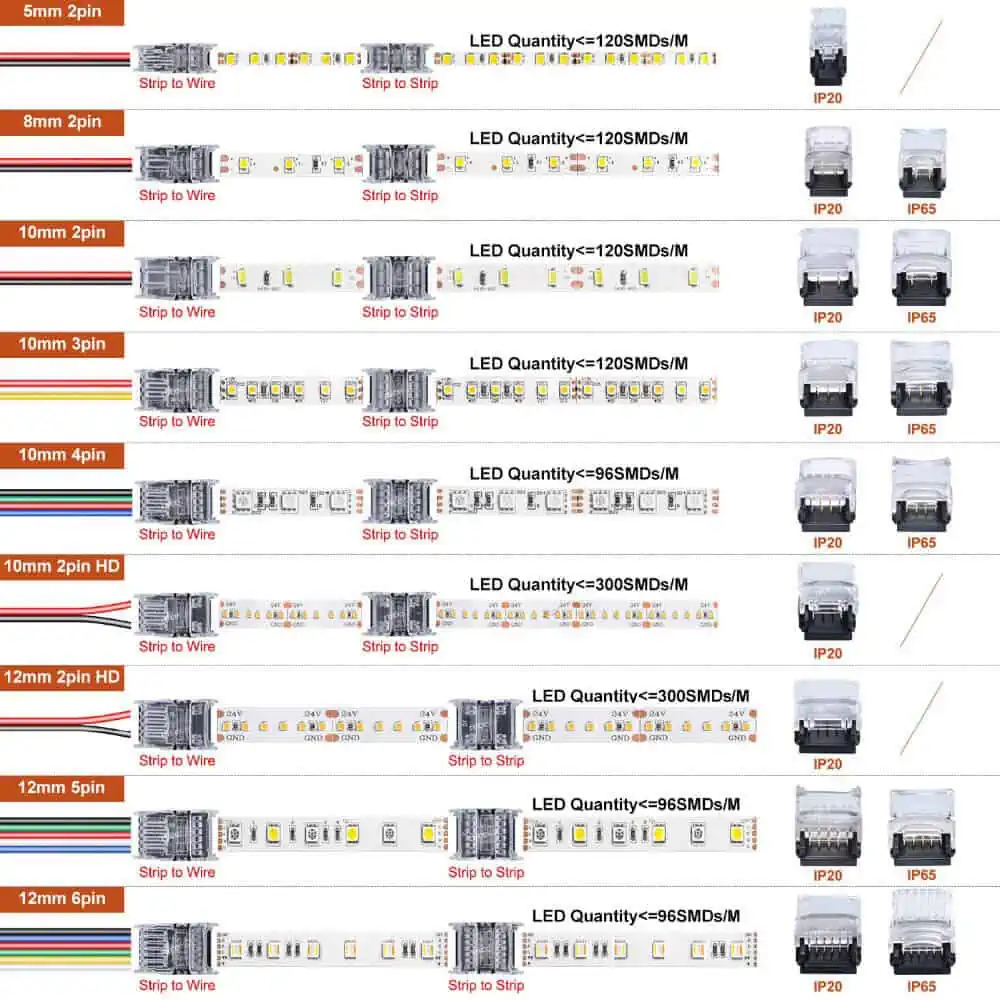
Based on the PCB of the LED strips, connectors can be of the following types-
- 5MM
- 8MM
- 10MM
- 12MM
Besides these measurements, if you need any customizations, contact LEDYi. We provide quality LED strip connectors with customization facilities.
LED Strip Connectors Based On the Connection Type
Depending on the variation of connections, LED strips connectors can be of the following types-
- Strip to Wire
- Strip to Power
- Strip to Strip Joints
- Strip to Strip Bridge(Jumper)
- Corner Connection
- Strip to other Connector Adapter
Soldering Vs. LED Strip Connector
You already learned about the two LED strip connecting procedures from the above section. Now let’s find out the differences and the better one between them-
| Factors | Soldering | LED Strip Connector |
| Stability | High | Acceptable |
| Convenience | Low Convenience | High Convenience |
| Maintenance | Hard | Easy |
| Learning Curve | Hard to learn | Easy |
| Cost | Higher | Lower |
The chart above shows the differences between soldering and LED strip connectors, but which is better? To find the answer, let’s compare these two in detail-
Stability: LED strip connectors are made of plastic, which can expand or contract when installed in an environment with high temperatures. Besides, strip connectors can loosen the joints when LED strips are placed on a continuously vibrating surface. In these cases, going for soldering is the best option. Soldering ensures a robust connection between the strips and lets them stick firmly to each other. That is, soldering is more stable and reliable than LED strip connectors.
Convenience: When you are required to join LED strips, the preference will always be fixing that in the easiest way possible. But you will not always have a soldering iron on hand. In this case, LED strip connectors are your ultimate solution. They are easily available and simple to use. So, in terms of convenience, LED strip connectors are better than soldering.
Maintenance: Due to poor SMD soldering, inadequate heat conduction, faulty resistors, bad LED chips, etc., LED strips may need replacement. And if the strips are joined using a connector, replacing the damaged strip is quite easy. You can open the connector and quickly take the strip out. But if the strips are soldered, you must contact a qualified electrician to fix this. So, maintenance of LED strips with connectors is much easier than soldering.
Learning Curve: If you are not an electrician, soldering is a challenging task to learn. However, using the connections is so simple that you will not require learning the skill. Besides, you need not be concerned about the wrong polarity because you can quickly unplug and correct the issue. Additionally, burns are not an issue to worry about with connectors, nor is the odor of rosin. In contrast, soldering irons can get as hot as 300°C/570°F, which can be risky. In this sense, LED strip connectors are better and safer, especially when you are not professional.
Cost: You can get LED strip connectors within a dollar. In contrast, soldering requires equipment like a soldering iron and a professional electrician. This makes soldering expensive.
So, comparing all these factors, we can say LED strip connectors are best if you want an easy, quick, and affordable solution for connecting your LED strips. However, for more stability and reliability, going for soldering is better.
Will Both Part Of The LED Strip Work After Cutting?
Both parts of the LED strip will work ok if you cut them at the proper marking and connect them accurately.
Most of the LED strips have similar cut markings. In a LED strip, you will find some copper lining after every few LEDs ( 3 or 6 or more). Between these copper linings, there is a scissor icon. This icon indicates the cut marks. If you cut the strip exactly on that location, your strip will surely work.
But if you cut at the wrong place, the LED circuit near the cut will get damaged, and the LED will not glow. Beside permanent damage, you may also face some issues like flickering, sudden shutdown, etc. So, be careful when cutting the LED strips.
How To Install LED Strip Lights After Cutting?
Once you cut your LED strip as per your required length, it’s time to install them. Here are the steps to install LED strips-
Step-1: Clean & Dry the Installation Surface
After sizing your LED strip, the first step is to clean the installation surface. Take a clean cloth and dust off the wall properly. If you find the surface too dirty, use soap, alcohol, or phenol to clean it. And after cleaning, let the surface dry completely. This is an essential step, as the adhesive backing will not sit if there is dust and dirt on the wall. So, never skip this step.
Step-2: Peel Off The Adhesive Backing
Ensuring your surface is completely clean and dry, now it’s time to start the installation process. For that turning the LED strips, you will find adhesive backing. Peel off the sticker and get ready to mount the strips.
Step-3: Mount The LED Strip
Place the strips in the desired location, and press them with your finger. This will let the strip stick to the surface perfectly. Here, you can use some clips to ensure the strips don’t fall from the wall easily. However, in using the adhesive, considering the surface type is vital. For example- installing LED strips with adhesive backing is ok for wood, plastic, metal, vinyl, or any smooth surface. But on textured surfaces, like orange peel or painted drywall, the adhesive will peel off over time. You can use clips or channels to install the LED strips in this case. To know more about the LED strip mounting process, check out Installing LED Flex Strips: Mounting Techniques.
Step-4: Connect It To The Power Supply
Once your LED strip is mounted, it’s time to power it up. Connect the LED strip to the controller and then to the power source. Now turn on the switch and see your LEDs glowing. If the light doesn’t glow, check if the controller is connected correctly and if the voltage of the power source matches the LED strips. However, if the issue concerns wrong strip cutting, check the below section to find a solution.
Troubleshooting: LED Strip Not Working After Cutting
The LED strip can show some issues after cutting. These may include- flickering, brightness issues, or complete shutdown of lights. To solve this problem, first, you need to know the reason for such issues-
Cause: After cutting the LED strips, you may find the strips are not working. Or one half of the cut strip is working; the other is not. These issues may also occur when you reconnect the two strips. Here are the causes of these issues-
- Cutting the uncuttable LED Strips: All LED strips are not cuttable. So, if you cut an LED strip without any cut markings, it will not work.
- Wrong cut: LED strips have cut marks on them. This indicates that one circuit has ended and another has begun; cutting at this point is safe. But if you cut them in any other place except the cut marks, it will damage the circuit, and the LEDs will not glow.
- Incorrect polarity: If the LED strips are connected to the power supply with the wrong polar connection, the light will not work after cutting the LED strips. For example- connecting the positive (+) to the negative(-) won’t work.
Solution: Here is the solution that you can apply to fix your LED strip-
- Check for loose connection: When using LED strip connectors to join the LED strips after cutting, the joining may get loosen. Sometimes, the connection between the power supply may also get loose, shutting off the lights. In this case, check the connection and fix it if you find looseness.
- Re-cut & reconnect: The LED strips will stop working due to wrong cuts. To fix this issue, pre-marked cut points and cut them there. And now reconnect the strips using connectors or soldiers. You will see the strips working perfectly.
- Ensure correct polarity: LED strips must have correct polarity when joined to other strips. That is, the positive(+) must meet the positive (+) & negative(-) to the negative(-). So, ensure this; your LED strip will start glowing.
However, if this solution doesn’t work, find if there is any manufacturing fault with the fixture. And contact an electrician if you fail to solve the issue.
For more information, you can read Troubleshooting LED Strip Problems.
FAQs
The Bottom Line
So, from the above discussions, we learned that LED strips are cuttable and can also be reconnected. They have scissor icons on their PCB, which indicates cutting marks. Following those points, you can quickly cut them to your required measurement using scissors. But all LED strips are not suitable for cutting, i.e., RGBIC LED strips. The integrated circuit installed in them doesn’t allow you to make any cuts on the strips.
However, after cutting the LED strip, it is possible to reconnect them. For that, you can use LED strip connectors or soldering. Soldering is a more traditional process for joining the LED strips. Though soldering provides more stability to the strip connection, this process is challenging for commoners. It requires soldering iron that only professionals can handle correctly. In contrast, LED strip connectors are the simplest and best solution for LED strip reconnecting. These small plastic connectors join the strips and ensure accurate current flow. Besides, these connectors are affordable and readily available, and anyone can easily use them. So, if you want to reconnect the LED strips on your own or plan for any DIY strip lighting, our LEDYi strip connectors are the best solution!
LEDYi has a huge collection of strip connectors based on PINs, IP ratings, connection types, and more. So, besides our premium LED strips, you can also go for our high-quality & versatile LED strip connectors.