What is led strip light?
The flexible LED strip light is made of FPC as the assembled circuit board, and the high-brightness LED is used as the light source. The thickness of the LED strip light is only the thickness of a coin, and it does not occupy space. The flexible LED strip light can be cut, and it can also be extended without affecting the light. Because the FPC material is soft, the LED strip light can be bent, folded, rolled, moved, and stretched freely in three-dimensional space without breaking. It is suitable for irregular places and small spaces. Because it can be bent and rolled arbitrarily, it is ideal for various patterns in advertisements and other decorations.
LED strips are widely used in a wide variety of applications. We often need to cut the led strip according to our requirements when we use led strips. But some new beginners do not know how to cut, connect and light LED strips. This article is here to help these people to solve the problem.
The article is mainly divided into 2 parts:
Part 1: Cut, connect and power LED strips by soldering
Part 2: Cut, connect and power LED strips by solder-free connects
Where can I cut led strip?
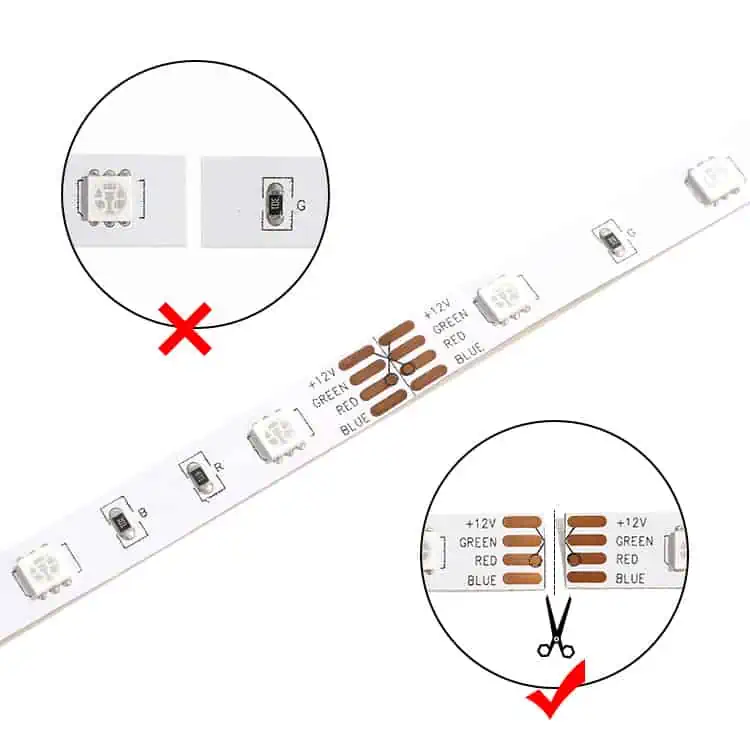
Before cutting the LED strip, make sure that the LED strip you have purchased can be cut. Otherwise, cutting the LED strip may render it unusable. Also, always remember to disconnect the power supply; it is very dangerous to cut a LED strip that is directly connected to the power supply.
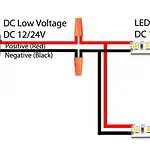
Normally, the led strip is generally divided into 5V, 12V, 24V according to the voltage.
5V is one led per cut
12V is three led per cut
24V is six or seven led per cut
And the led strip will have a black line and a scissors mark at the cut position.
It is very important to cut only on the given cut position when cutting LED strip light. Cutting through or before the cut position will result in no electrical conductivity to the following section.
Part 1: Cut, connect and power LED strips by soldering
1.1 Cut, connect and power IP20 none waterproof SMD LED strip by soldering
Step 1: Measure the length
Step 2: Find the cut position on the led strip
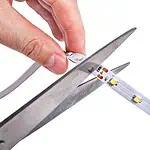
Step 3: Cut the led strip light
Step 4: Soldering cable to led strip light by electric iron
Step 5: Attached the heat shrink tube to protect the soldering point
Step 6: Soldering two-piece led strip together by electric iron
Step 7: Light up the led strip to test
1.2 Cut, connect and power IP20 none waterproof COB LED strip by soldering
Step 1: Measure the length
Step 2: Find the cut position on the COB led strip
Step 3: Cut the COB led strip Light
Step 4: Soldering cable to COB led strip light by electric iron
Step 5: Attached the heat shrink tube to protect the soldering point
Step 6: Soldering two-piece COB led strip together by electric iron
Step 7: Light up the led strip to test
1.3 Cut, connect and power IP52 silicone coating SMD LED strip by soldering
Step 1: Measure the length
Step 2: Find the cut position on the led strip
Step 3: Cut the led strip light
Step 4: Remove silicone from the led strip pad
Step 5: Soldering cable to led strip light by electric iron
Step 6: Fill silicone on the led strip pad
Step 7: Attached the heat shrink tube to protect the soldering point
Step 8: Soldering two-piece led strip together by electric iron
Step 9: Light up the led strip to test
1.4 Cut, connect and power IP65 silicone tube SMD LED strip by soldering
Step 1: Measure the length
Step 2: Find the cut position on the led strip
Step 3: Cut the led strip light
Step 4: Remove 3M tape adhesive
Step 5: Fill silicone in led strip and endcap
Step 6: Put led strip into silicone endcap
Step 7: Clean silicone from led strip
Step 8: Cut off some silicone tube from the strip pad
Step 9: Soldering cable to led strip light by electric iron
Step 10: Fill silicone in led strip and endcap
Step 11: Light up the led strip to test
1.5 Cut, connect and power IP65H heat shrink tube SMD LED strip by soldering
Step 1: Measure the length
Step 2: Find the cut position on the led strip
Step 3: Cut the led strip light
Step 4: Cut off the heat shrink tube from led strip pad
Step 5: Soldering cable to led strip light by electric iron
Step 6: Attached the heat shrink tube to protect the soldering point
Step 7: Soldering two-piece led strip together by electric iron
Step 8: Attached the heat shrink tube to protect the soldering point
Step 9: Light up the led strip to test
1.6 Cut, connect and power IP67 silicone tube & silicone filling SMD LED strip by soldering
Step 1: Measure the length
Step 2: Find the cut position on the led strip
Step 3: Cut the led strip light
Step 4: Remove 3M tape adhesive
Step 5: Fill silicone in led strip and endcap
Step 6: Put led strip into silicone endcap
Step 7: Clean silicone from led strip
Step 8: Cut off some silicone from the strip pad
Step 9: Soldering cable to led strip light by electric iron
Step 10: Fill silicone in led strip and endcap
Step 11: Light up the led strip to test
Part 2: Cut, connect and power LED strips by solder-free connector
2.1 Cut, connect and power IP20 none waterproof COB LED strips by solder-free connector
Step 1: Measure the length
Step 2: Find the cut position on the cob led strip
Step 3: Cut the led strip light
Step 4: Remove 3M tape from cob led strip
Step 5: Put cob led strip into solder-free connectors
Step 6: Light up the led strip to test
2.2 Cut, connect and power IP52 Silicone coating SMD LED strips by solder-free connector
2.3 Cut, connect and power IP65 Silicone tube SMD LED strips by solder-free connector
2.4 Cut, connect and power IP67 Silicone filling SMD LED strips by solder-free connector
FAQs
Conclusion
In conclusion,LED strip lights can provide a great way to add light and ambiance in various spaces. With the proper tools and supplies, anyone can complete the task of cutting and connecting LED strip lights with ease.
LEDYi manufactures high-quality LED strips and LED neon flex. All of our products go through high-tech laboratories to ensure the utmost quality. Besides, we offer customizable options on our LED strips and neon flex. So, for premium LED strip and LED neon flex, contact LEDYi ASAP!