Have you just changed the power supply of your LED strips? Or are your strip lights facing flickering issues? Try resetting the LED strips to fix them up!
To keep the functioning of the LED strips on track, you may often need to reset them. It is pretty easy to do this task; you can reset the LED strips by turning off the power supply and on it again. However, many LED strip lights have a ‘Reset button’; you can also use this to reset your strip lights.
In this comprehensive guide, I will share my experience of how I reset my LED strip lights over the years with some step-by-step instructions. Also, I will mention some tips about when you need to reset these lights and some troubleshooting ideas. So let’s start–
Reset LED Strip Lights – Stepwise Guide
Let’s see the process of resetting the LED strip lights with two effective methods and fixing your lights conveniently in no time. So, read this section thoroughly and apply these steps while resetting the strip lights–
Method-1: Power Supply Method
This power supply technique is simple; you just need to follow four steps. Then, you are done with resetting the LED strip lights. Check this method out–
Step 1:Turn Off the Power
Before starting, you must ensure the LED lights are disconnected from the power station. So, unplug the wires or cords joined to the strip lights. Or you can just turn off the connected switch.
Step 2: Wait for a Few Seconds
After that, examine the connections between the light strips and the power source again. Make sure all cords are secure to reset the light without poor connection and risk.
Step 3: Reconnect the Power
At this time, you need to reset those lights. You can do this by remote controller if you own one. Or you can flip the button on and off for a few seconds to allow the lights to reset themselves.
Step 4: Test the Lights
Finally, before putting the lights back in their areas, it’s best to test them. Otherwise, you need to fix them again, which is time-consuming and frustrating.
Method-2: Remote Power Button Method
Many of the LED strip lights have a reset button. You can use this to restart your LED strips. The process is as follows-
Step 1: Plug in the LED Strip Light
First, make sure the light is plugged into a power source. If not connected to the power supply, the resetting option will not work. So, you need to put the cord into the outlet. And be careful that your finger does not meet the plug metal when doing that.
Step 2: Find the Reset Button
Now, it’s time to search for the reset switch. This is usually situated on the back or side of the unit. On the button, it can be labeled as “Reset” or have a picture of the reset sign.
Step 3: Turn off the LED Strip
When you get the reset switch location, turn the LED strip light off. You can do this by disconnecting it from the power switch or turning it off. Either one will work.
Step 4: Take Out the Power Adapter
Then, remove the power adapter from the strip lights. Again, ensure you do not touch metal elements with your fingers. If you are unsure about detaching the adapter, you can notice whether the lights on the LED strip are still bright. If they are, the adapter has not been removed; you have to disconnect it.
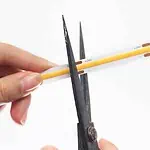
Step 5: Press and Hold the Reset Button
Once the power adapter is unplugged, push and hold the reset switch for 3 to 5 seconds. And as the button often comes with a small shape, you need to press it with a pencil or other object.
Step 6: Plug in the Power Adapter Again
After holding the reset switch, attach the power adapter back to the strip lights. To ensure that the power adapter plugs correctly, you can check the lights on the LED strip if turned on.
Step 7: Turn on the LED Strip Lights
Now, switch on the strip lights by flipping the button or attaching it back to the power source. The LED strip light finally reset and should be working correctly.
When Should You Reset LED Strip Lights?
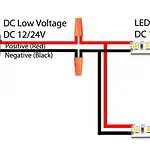
- Connectivity Issues: LED strip lights don’t work properly when the strip is not correctly joined with its power source. Therefore, you must check if all the connections are firm and secure when performing.
- Light Flickering: Another cause is light flickering; often, this problem indicates that the LED strip needs to be reset immediately. Remember to turn off the light before attempting the reset steps.
- Change In Power Supply: It is also a usual problem for needing to trouble the LED lights. Power shutdown and fluctuations will prevent the light from working correctly. So, to fix this issue, you need to reset the lights to check whether it is the cause behind this problem.
- Changing Remote or Its Battery: When you change the remote with a new one or the batteries of the LED strip light, you have to reset them. As they need to sync up again with the latest remote.
- Problems with the controller: This is also a common reason to require the LED light troubleshooting. It could be for an outdated or defective controller or if you want to rearrange your lighting. In any of these cases, you have to reset the light to work correctly again.
- Changes In Settings: If you get bored with the same setting and want to make some changes like intensity or color, it’s best to reset them. Hence, it will help to avoid further issues, and the changes will work properly.
- Part Of Maintenance: When you use LED strip lights for a long time, they can begin to malfunction because of wear and tear. So, to keep the light at proper function, resetting is necessary.
What To Do When Restarting Isn’t Helping? – Troubleshooting
After resetting your LED strips, if they don’t work, here are the ways to troubleshoot the fixture-
- Try replacing the batteries: Sometimes, restarting the LED lights does not work because of the defective batteries. To check whether the battery is the main reason for this issue, you need to take off the old batteries from the strip lights and replace them with new ones. After this fixing, remove the burnt-out bulbs if you find any in the LED light strip.
- Ensure there is no loose wire: You should eliminate any lingering old wires by cutting them with a wire cutter, removing their insulation with pliers, and then neatly concealing them. Also, ensure no loose wires are hanging around before inserting your new batteries into the appropriate slots to power up the device.
- Try a different power source: Another option is experimenting with an alternative power source. A few people have got positive results using a 9-volt battery instead of the standard 4 AA batteries. You can also consider replacing your current AA batteries with AAA ones. Use a surge protector if the issue persists after attempting a different power source. Plus, it’s possible that your LED lights can simply require recalibration to their default settings. Turning on different lighting modes or adjusting the brightness settings could often resolve this.
- Clean the contact locations: When you try all those things and your strip light is still not working, the issue can be the contact point. Therefore, using a Q-tip or cotton swab removes dirt and debris from the contact area. Then, switch on the light to see if it works.
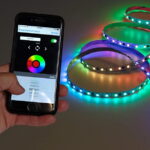
- Resetting the controller: If the LED lights still don’t work, the last thing you can do is reset the controller. So, push the start button and hold down it for 3 seconds. Afterward, release the switch for about 15 seconds, then start again. You can also connect your LED strip to your phone. This makes resetting much more convenient. To learn more, check this article- How To Connect LED Strip Lights To Phone?
Tips For Extending The Lifespan Of LED Strip Lights
- Proper installation is the key to extending the lifespan of LED strip lights. So, install the light by ensuring they are in an excellent position to contact the controller and power socket. Also, check if they need to bend excessively, it can spoil the circuit board.
- Although this light produces minimal heat, without correct heat dissipation, it can impact the lifespan. So, do not cover the lights, and you can install them on a metal, as it can absorb heat.
- Using your LED lights with incorrect power sockets can affect and shorten the light’s lifespan. Try to use a power source with enough wattage and proper voltage capacity.
- If you have LED strip lights set up in outdoor locations or places with high humidity, ensure they are suitable for those conditions. For instance, LED strips with an IP rating are designed to withstand water and dust.
FAQs
The Bottom Line
Performing a reset on your LED strip lights can be done by solving connectivity issues, controller problems, or changes in the power socket. After following the reset steps from this blog post and applying the troubleshooting tricks offered, you can easily reset the light strip. And fix them to work correctly again. However, if you can’t fix any issues, feel free to contact the manufacturer for further help.
You can check our LED controller to reset your stripes with ease. It allows you to set the lights’ brightness, customize light color, and more. LEDYi provides premium LED strips with top-notch LED controllers. We have devices suitable for all types of LED strips, whether it’s for single color, RGB, or digital strips. To learn more, check this- LED Controller: A Comprehensive Guide. RF, Bluetooth, Wi-Fi, DMX512, and more categories of LED controllers are available. Visit our website to order yours now!