LED strips are famous for their flexibility. But can you bend or fold them to install around the corners? Or is there any way to mount them on corners without damaging the strips?
You can install LED strips around the corner by folding them to angles that fit your corners or using LED strip connectors. Both methods work okay, yet using an LED strip connector gives a more even lighting. However, the folding or bending method is also great for beginners as it doesn’t need any additional tools or technical skills.
As an LED expert, I know where you may face issues while installing LED strips. Corner areas are tricky to mount the LED strips. So, if you don’t know the correct way to bend or fold the strips, it will damage the LEDs or the entire strip. I bought this guide on installing LED lights around corners to prevent such issues. Let’s start-
5 Methods To Install LED Strips Around Corners
You can install LED strips around the corners in different ways. Here, I listed out 5 best methods for you to mount the strips to any kind of edge or corner with ease-
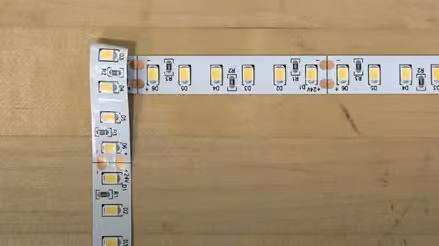
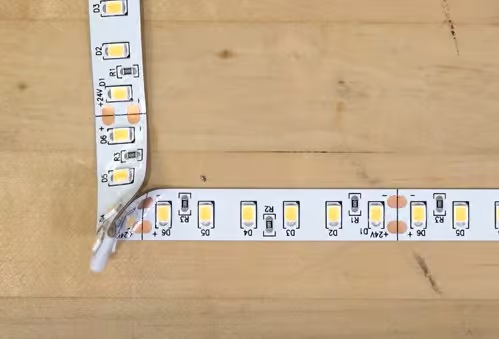
Method#1: The Corner Fold Or 90-degree Fold
The corner fold, also known as the 90-degree fold, gives a professional approach to your LED strip installment in corners. You will not need any additional instruments or cutting hassles for this process. All you need to do is fold the strips to 90 degrees, giving it a neat finish. The process is as follows-
- Find the point where you need to give an angular shape to fit the corners
- Hold the strip back (in the opposite direction) to a 45-degree angle
- Bend it back to create a 90-degree angle and firmly press it down
- Use superglue to hold the fold in place
Pros
- Creates precise 90-degree angles
- No extra tools need
- Ideal for an urgent situation; you don’t need to buy connectors
- Ensures uniform lighting around corners
Cons
- Can’t fold if there is LED in the corner
- Not ideal for waterproof LED strips; if the folding is too hard, it can break the waterproof coating
- This can lead to short circuits
- The strip can break at the folded corner
Method#2: 90-Degree Pitch Or The Ribbon Bend
The ribbon bending technique, also known as 90-degree pitch, is easier than the corner fold. If you are a beginner and installing LED strips around the corner for the first time, this method is for you. However, the folding will not affect the lighting quality. The process of the ribbon bend is as follows-
- Place the LED strip on a plain surface
- Target the place of bending and twisting the strip in a looping style
- Curl it tightly to change the direction.
- Use superglue or adhesive tape to join the loop to the surface.
Pros
- Easy to bend
- No tools required
- Ideal for spaces where strips are not visible
Cons
- It may not give a finished look
- If twisted tightly, it may break the waterproof coating
- Have chances to damage the LED if it sits within the fold.
Method#3: Accordion Folds (The Curve)
Use the accordion fold method to install LED strips to round corners or angles greater than 90 degrees. This is a good option to create gradual curves in your strip lights. Here is the process to follow-
- Make small accordion folds spacing out by several inches
- Use glue or adhesive to set each fold to define the curve.
Pros
- Great for round corners
- No special connector is required
- Can create artistic lighting patterns
Cons
- Hard to bend
- Not friendly for beginner
- High risk of LED damage
- Time-consuming process
- Not suitable for precise angling
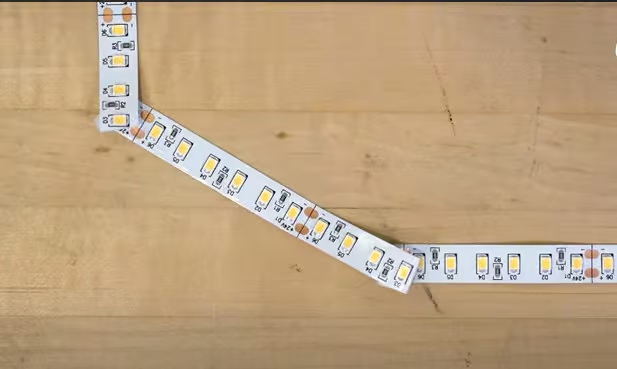
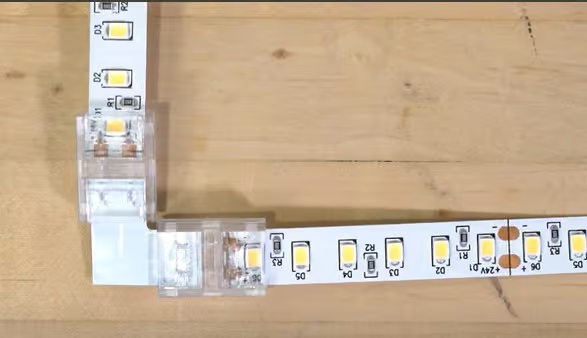
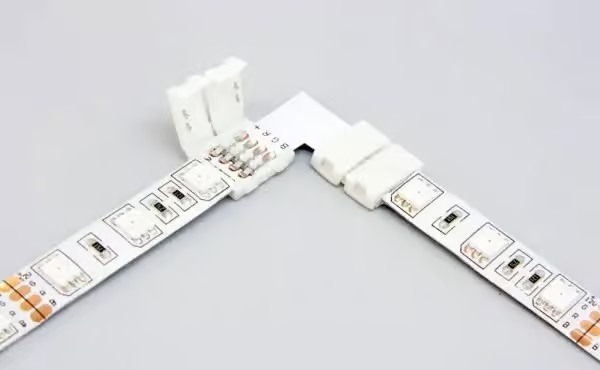
Method#4: Use L-Shape Connector
L-shape connector or back-to-back connector is a good choice for the neatest corner lighting. These are small L-shape solderless connectors that connect to LED strips together. Using this, you can bring a better lighting output than the 90-degree bending of the ribbon bend or the corner fold. The process of using L-shape connectors for corner LEd strip lighting is as follows-
- Purchase L-shape connectors.
- Find the point where you need to angle the LED strip to fit the corner
- Make a cut at that point; your LED strip will be divided into two.
- Connect both ends of the jump connector to the two pieces of LED strips
- Lock both sides.
Pros
- Gives a smooth and even lighting effect to the corners
- Easy to use and secure
- Waterproofing also remains intact
- Minimal space between the joints
- No risk of short circuits
- Effective for creating 90-degree angles.
Cons
- Additional cost to purchase clips
- Has the risk of the wrong cut
- Not ideal for round edges
- Connectors can become loose
NB: To bring flexibility to L-shape connectors, choose L-wire connectors. These are bendable, so you can also use them in round edges. This can be a better alternative to the accordion curve.
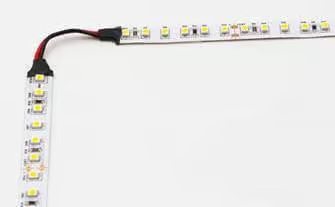
Method#5: The Cut-and-Jump
If your LED strips are not bendable, a jump connector is the ultimate solution to install the strips around the corner. These connectors are flexible enough to bend in any direction. Besides, these jump connectors are easily available. The process of connecting these to your LED strip is as follows-
- Buy LED strip jump connectors
- Cut the LED strip to the point where it needs to bend
- Connect both ends of the jump connector to the two pieces of LED strips
- Do soldering if requires
Pros
- Ideal for unbendable LED strips
- Flexible to move in any direction
- Works get on irregular corners or edges
- Saves installation time
Cons
- Need additional tool- jump connector
- Soldering is required in some cases
- It may not be suitable for beginners
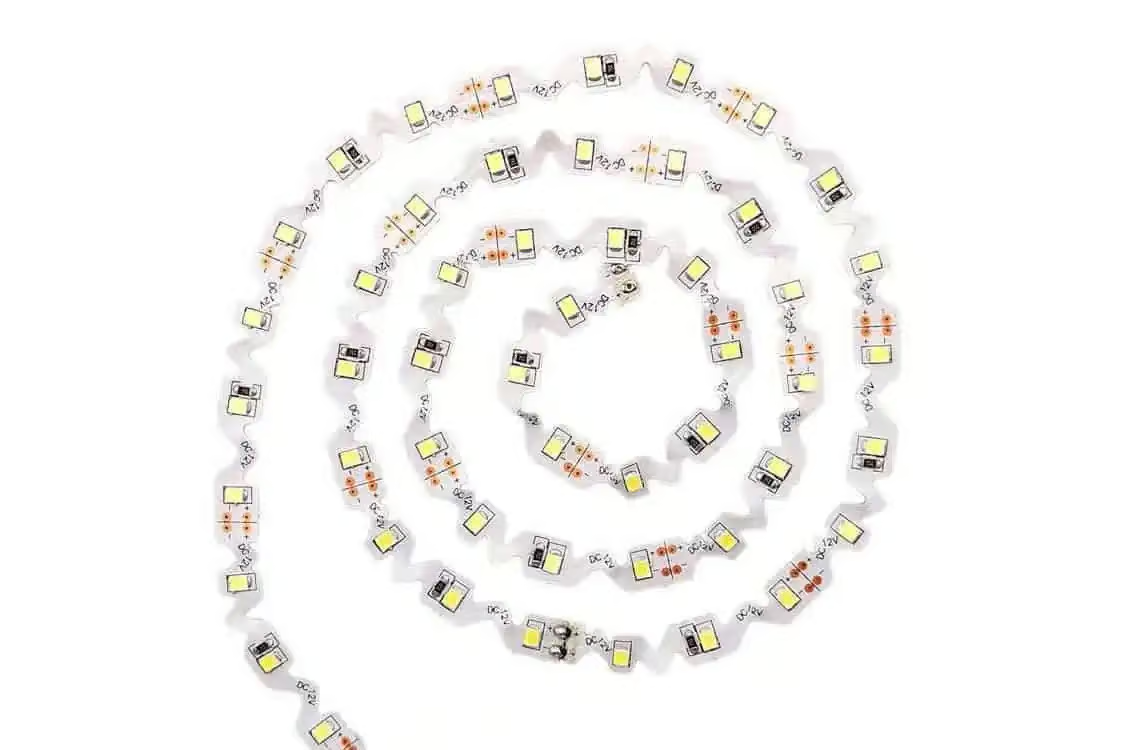
Method#6: Use the Pre-Bend LED Strips
Pre-bend LED strips are also available if you don’t want to take the hassle of bending the LED strips manually. You will find L-shaped, U-shaped, J-shaped, or S-shaped LED strips that will fit your bending requirements. Installing these strips is quite simple. You only need to peel the pre-bend LED strip and paste it to the corners. That is it!
Pros
- Easy to install
- No risk of breaking
- Come in a variety of shapes and sizes
Cons
- More expensive than regular LED strips
Steps To Install LED Strip Lights Around Corners
The installation process of the LED strip around the corners is as follows-
Step-1: Take Measurements
Take a measuring tape to determine how many LED strips you need for lighting. Purchase LED strips based on the required length; it is better to purchase some extra meters. Once you have your strips, place them in the place of installment, including the curves or corners. Target where you need to bend the LED strip to cover the corners.
Step-2: Decide The Bend Type
Now, decide what type of bending you want. You can follow any method as discussed in the above section. If you don’t have connectors, bend the strips in a 90-degree fold or follow the ribbon bend. For round edges, go in accordance. However, if you have LED strip connectors, using that will be best to get the best results.
Step-3: Collect Required Materials
The material requirement for installing LED strips around the corners depends on how you bend the strips. No extra material is required if you simply fold them to fit the corners. Only a super glue or adhesive tape will make the folds firm. However, if you use LED strip connectors, you will need the following-
- LED strips
- LED strip connector
- Sharp Scissor
Step-4: Clean The Surface
Once you have gathered all the requirements, it’s time to prepare the surface of installation. Use a wet cloth or rub alcohol to wipe out the dust and dirt from the surface. You can also make a DIY cleaning solution by adding vinegar to lukewarm water. Remember, the LED strips will not stick to the surface if there is any remaining dust. Besides, dry the place completely before mounting the LED strips.
Step-5: Prepare The LED Strip To Fit Around The Corners
The main game of placing the LED Strip in the corners starts now. The process of preparing the LED strips will vary with your chosen method. Here, I am describing it in detail-
- Fold the LED Strip
Fold the LED strip to any bending method- 90-degree fold, the ribbon bend, or the accordion fold. Use super glue or adhesive to set the foldings to the point. This will give a firm shape to the LED strips to fit on the corners.
- Use LED Strip connectors
Cut the LED strip to the point of angling using a sharp scissor. Now connect the LED strip connector to both the LED strip pieces and lock them up. Ensure they are tight enough to avoid loose connections.
Step-6: Installation Removing The Adhesive Backing
Once the LED strips are shaped to fit the corner, move to the installation process. Remove the adhesive backing of the strip and mount it to the corners. Press it well to ensure it sticks firmly to the surface. You can also use clips to strengthen the installation. For more LED strip mounting tips, check this- Installing LED Flex Strips: Mounting Techniques.
Step-7: Power Up
After installing the LED strip, it’s time to power it. Connect the LED strip to an LED driver if you have low-voltage LED strips. This will keep the current flow in check, preventing your strips from overheating.
How To Connect Two Separate Light Strips At a Corner?
When installing LED strips on the corner, you may require cutting the strips to give it a 90-degree or wider angle. In this case, you must rejoin the strips to ensure the light works. You can do so in three methods these are as follows-
- Using a corner connector
Corner LED strip connectors usually come in an L-shape. They are excellent for corners with 90-degree angles. You can get a neat installation around the corners using these connectors. First, you need to purchase the appropriate corner connector. Then, cut the LED strips at the bending point and connect the two parts of the LED strip with the connector. Lock it up, and it is done!
- Soldering the light strips
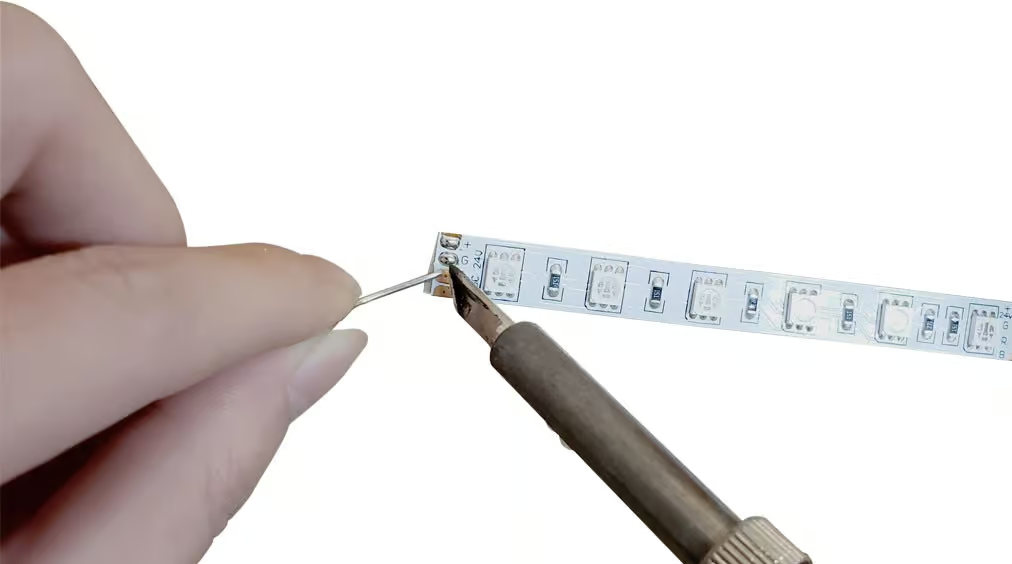
Soldering is the most robust way to connect two LED strips in the corner. This gives a professional and permanent solution to LED connection. For this, you must pre-tin and apply heat to the soldering pad of one of the LED strips, removing the adhesive backing. Now, solder the heated area and place the non-tinned LED strip over it. Keep heating it until the solder melts and flows. However, if the strip gets too hot, the circuit casings may begin to lift from the PCB substrate. Thus, you can join the two LED strips using a soldering method.
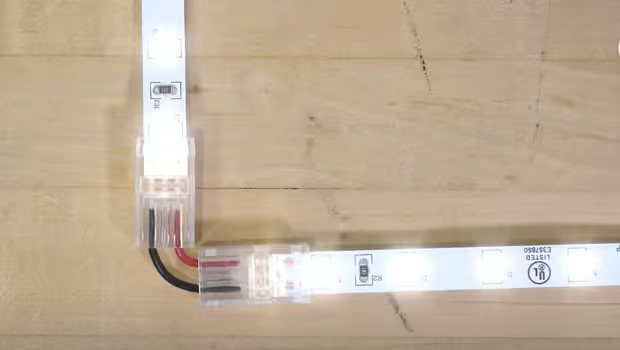
- Using a cable connector
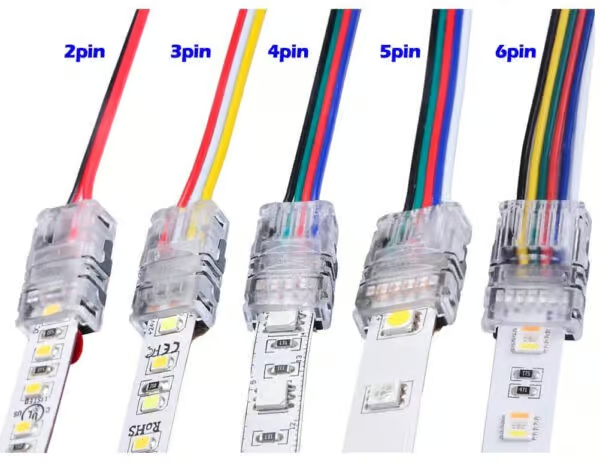
LED Strip Connectors with cables are small devices that complete the electric circuit, combining two LED strips and making them glow. They can be of different types based on PINs, IP rating, PCB-wide function, etc. All you need to do is buy the appropriate LED connector and join it to the strips. However, to get the ideal connector, you must consider the type of LED strip you have. Different types of LED strips have different connector requirements. These will be clear from the below:-
| No. of PINs For Strip Connectors | Type of LED Strips |
| 2 PINs | Single color LED strips. |
| 3 PINs | Tunable white LED strips & Addressable LED strips |
| 4 PINs | RGB LED strips |
| 5 PINs | RGB+W or RGBW LED strips |
| 6 PINs | RGB+CCT & RGB+Tunable white LED strips |
To know more about connecting the LED strips, check this article- Can You Cut LED Strip Lights and How To Connect: Full Guide.
Tips For Mounting LED Strip Lights Around Corners
The above section taught you different techniques and processes for installing LED strips around corners. In this section, I will give you some tips to do the task correctly. These are as follows-
- Use super glue when bending the LED strips
LED strips are bent in different folding methods, like a 90-degree fold or accordion fold. The foldings can get messy as you move the strips or as time passes. This ultimately results in uneven lighting. So, always apply super glue or adhesive to the folding to keep them in shape.
- Select the LED strip connector over the strip bending method.
The bending method is the easiest way to install LED strips around the corner, as you don’t need any additional tools. But I suggest you use LED strip connectors instead of a folding method. This will prevent your LED strip from any damage due to folding. However, connecting the strips with soldering can give the LED strips more form structure as strip connectors can get loosen over time.
- Choose the right connector width
In choosing the LED strip connector, consider the PCB wide. If your LED strip connector is small, it won’t fit the strips. Again, if it is too big, the connection will loosen easily. So, consider the width of the LED strip before purchasing a strip connector.
- Consider the PIN number
Different types of LED strips have different PIN requirements. For example, if you have an LED strip, then to connect them, you will need a 4 PIN LED connector. In contrast, a 2 PIN connector will work for single-color LED strips. Therefore, I suggest you be careful while choosing connectors’ PIN numbers.
- Avoid bending waterproof LED strips
Waterproof LED strips have a coating that prevents moisture from contacting the LEDs. But when you bend or fold the LED strip, there is a high chance of coating breakage. Thus, moisture will enter the strips, which will damage the LED.
- Make cuts following the cut marks
You will need to cut the LED strips for corner installation using an LED strip connector. In this case, you must be careful in cutting the strips. You will find some scissor markings in the PCB body indicating cut marks. Take a sharp scissor and cut the strips following the marking. If you cut outside the mark, the circuit will break down, and the LED strips will not glow.
- Use the Correct Polarity (+ Goes to +)
If the LED doesn’t glow after using the connector, there must be some polarity issues. Remember that the connector’s positive (+) side will join the strip’s positive (+) side. And the negative (-) will connect to the negative (-). If this polarity is not maintained, the lights will not glow. Besides, when you use RGB LED strips, make sure the letters line up with one another correctly.
FAQs
The Bottom Line
LED strip lights are suitable for corner lighting due to their flexibility and cuttable features. You can easily bend the LED strips to the required angle and mount them to the corners or edges. However, bending the strips is not always a good solution as it can damage or break the LEDs or waterproof coating. For this, an LED connector is the ideal solution. LEDYi has various LED strip connectors of different PCB wide, IP ratings, and PIN numbers. You can get suitable LED strip connectors for any kind of LED strip, from single color to RGB or tunable ones. Besides, if you want a pre-bend LED strip, do check our S-Shape Bendable Series.