LED strips are more and more popular and are an excellent choice for commercial, residential, and industrial lighting. They are efficient, easy to install and require very little maintenance. You can customize LED strips in various shapes and sizes, so you can use them to light almost any space.
What is a LED Strip Light?
An LED strip light (also known as an LED tape or ribbon light) is a flexible circuit board populated by surface mounted light-emitting diodes (SMD LEDs) and other components that usually comes with an adhesive backing.
Features of LED strips:
Flexible
LED strips are fully flexible and can be bent vertically up to 90 degrees. You can use them to light spaces and even wrap them around different shapes.
Color options
LED strips are available in various colors, such as monochrome, Tunable White, RGB, RGBW, RGBTW, Digital color changing.
Convenient Size
LED strips can be cut to any length you need.
You can design your project without worrying about the length of the LED strip.
Easy Installation
The back of the LED strip has 3M double-sided tape, you can easily stick the LED strip to where you need it.
Fully Dimmable
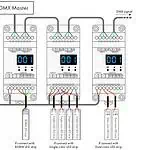
The LED strip supports a variety of dimming methods, such as PWM, 0-10V, DALI, DMX512, TRIAC dimming.
Long lifetime
LED strips have a lifespan of up to 54,000 hours.
Customizable
We can customize special led strips for your projects, such as custom colors, CRI, voltage, brightness, width, lengths, and more.
LED strips are generally divided into the following categories:
Static white and single color
Red, green, blue, yellow, pink, ultraviolet, infrared and white color with different CCT from 2100K to 6500K
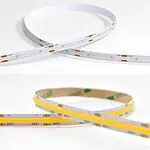
Tunable white
There are 2 different color temperature LEDs on the Tunable White LED strip. By using with controller, and the color of tunable white led strip can be changed from warm white to white light.
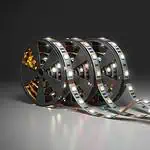
RGB Color changing
There are three channels, you can control the RGB led strip to create any color you want.
RGB+W Color changing
There are four channels, similar as RGB led strip, but with one more white color.
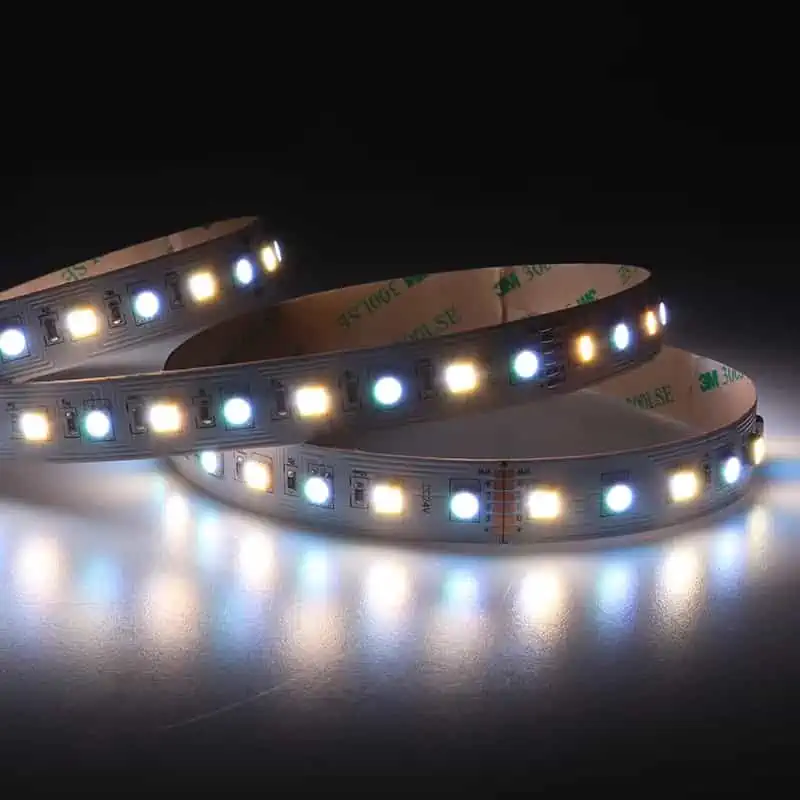
RGB+Tunable white Color changing
There are five channels, similar as RGBW led strip, but with one more white or warm white color.
Digital or Pixel Color changing
Digital led strips allow you to have different colors for every section of LED strip, creating various colors in different sections of one LED strip.
LED Strip Lights Manufacturing Process
Step 1: LED Lamp Production
Step 2: Create and Use Solder Molds
Step 3: Apply Lead-free Solder Paste Onto the Base PCB
Step 4: Component Placement
Step 5: Reflow Soldering
Step 6: Separate and Weld the 0.5m LED Strip Segments Together
Step 7: Aging and Waterproofing
Step 8: 3M Tape Pasting and Packaging
The main components of LED strips are LEDs, FPCB(Flexible Printed Circuit Boards), resistors or other components. LED strips are manufactured by using a process called Surface Mount Technology (SMT) Assembly Process to mount LEDs, resistors and other components onto the FPCB.

Using the PCBA process, we can actually customize your LED strips at the PCB level to meet your specific lighting needs. We also carry out quality control testing at the end of each step to ensure our products are up to standard. Let’s take a look at how this process works.
Step 1: LED Lamp Production
The first step is the production of LED lamps, also called LED encapsulation.
The LED lamps are the most important component, determining the quality of the LED strip. That’s why we don’t source LED lamps like other factories do. We manufacture our own LED lamps to ensure the high quality of our LED strips. Let’s take a look how to produce LED lamps.
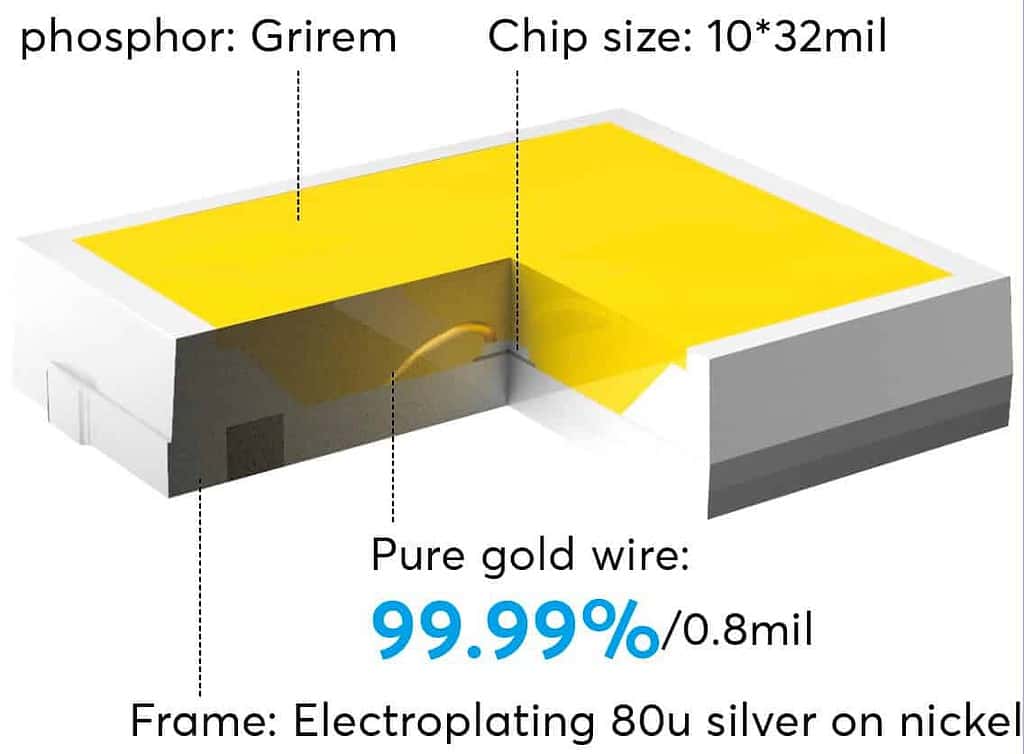
Step 1.1: Die attachment
Die attachment is a process in which the chip is bonded to the designated area of the frame through colloid (generally conductive glue or insulating glue for LED) to form a thermal path or electrical path, which provides conditions for subsequent wire bonding. We use chips from high-quality brands, such as Epistar, Sanan, etc.
Step 1.2: Wire Bonding
Wire bonding is the process of creating electrical interconnections between led frame and led chips using bonding wires, which are made of 99.99% gold.
Step 1.3: Phosphor Silicone Dispensing
Most LEDs in the market are based on blue-emitting LED chips with phosphors added to achieve mixed white light.
In order to get an accurate color temperature, we need to strictly adjust the ratio of phosphors. And the phosphor powder and the silica gel are mixed evenly, and then the phosphor powder silica gel mixture is added to the surface of the LED bracket to cover the LED chip. This step is very important. Many LED lamps have problems because the gold wire is disconnected, then the current can’t pass between LED chip and LED bracket, that cause the LED lamps can’t light.
Step 1.4: Baking
After Phosphor Silicone Dispensing, the LED lamp need to be baked in the oven to dry the moisture of the phosphor powder.
Step 1.5: Sorting
Packaged LEDs can be tested and sorted according to wavelength, Chromaticity coordinates x, y, light intensity, light angle, and operating voltage. As a result, the LEDs are divided into a plurality of bins and categories, and then the test sorter automatically packs the LEDs into different bins according to the set test standards. As people’s requirements for LEDs are getting higher and higher, the early sorting machine was 32Bin, which later increased to 64Bin, and now there are 72Bin commercial sorting machines. Even so, the LED technical indicators of Bin still cannot meet the needs of production and market.
For white color LEDs, our company adopts the strictest standard, 3-step McAdam, to sort LEDs. This means that our color consistency is so good that the eye has no way of seeing the difference.
Step 1.6: Taping
Before the LED is patched, the LED needs to be detected, oriented, and packaged in tape. The taped LEDs can be supplied to SMT placement machines at high speed for circuit board placement.
Step 1.7: Package
After taping, the LED lamp will be packaged by roll. Each roll is put into a static-discharging aluminum foil bag, then evacuated and sealed.
Step 2: Create and Use Solder Molds
stainless steel molds are created for each strip light design. They are holes that go on top of the bare PCB in order for the solder paste to be perfectly spread over the solder point.
Step 3: Apply Lead-free Solder Paste Onto the Base PCB
A number of loosely connected strips of bare PCB, 0.5 meters in length, make up the “PCB sheet”. It is placed under the mold and the lead-free solder paste filled the holes in the mold perfectly, resulting in defect-free pads.
Quality Test
The QC step ensures that each solder point has the right amount of solder paste and is prepared for the components to be placed on the solder points.
Step 4: Component Placement
Next, the PCB sheet is placed into an SMT placement machine. This machine picks up and places the resistors, LEDs and other components on the solder points with perfect accuracy and pressure.
We use high speed Japanese brand SMT machines to help us maintain high quality.
Quality Test
The PCB with all components attached is inspected again by quality control. If there is a misplaced part, it is noted and the PCB sheet gets reworked until it passes inspection.
Step 5: Reflow Soldering
Components will not be fixed on the PCB until the solder paste hardens. To do this, the PCB board is belted into a reflow oven. A reflow oven is a long oven with multiple zones where the temperature can be independently controlled as the PCB passes through.
Quality Test
After the LED sheet comes out of reflow soldering, we will do a quality inspection here. Light up the LED sheet to ensure that all the LEDs can light up normally. LED Sheets that are rejected are reworked or manually soldered until perfect.
Step 6: Separate and Weld the 0.5m LED Strip Segments Together
The 0.5m PCB sheets (made up of the many loosely attached led strips) are separated and soldered end-to-end until they achieve the specified length.
Generally, we will solder the segment PCB into a roll of 5 meters.
Quality Test
When we solder the PCB into a longer roll, we will inspect all the soldering places again to ensure that the entire LED strip can be lit normally.
Step 7: Aging and Waterproofing
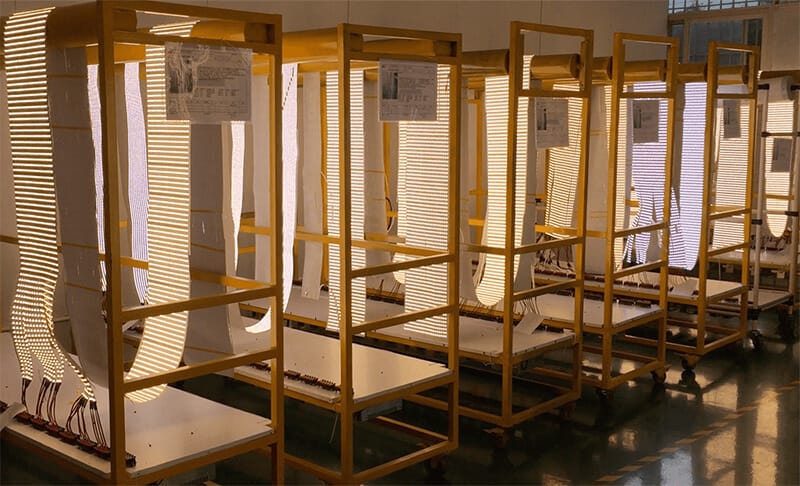
The welded LED strips will be placed in an aging test room, lit continuously, and will work for 12 hours. We call this step the burn-in test. This test can help us to find out the quality problems of LED strips as much as possible before shipping.
If some LED strips need to be used outdoors or underwater, they also need to be waterproof and dustproof.
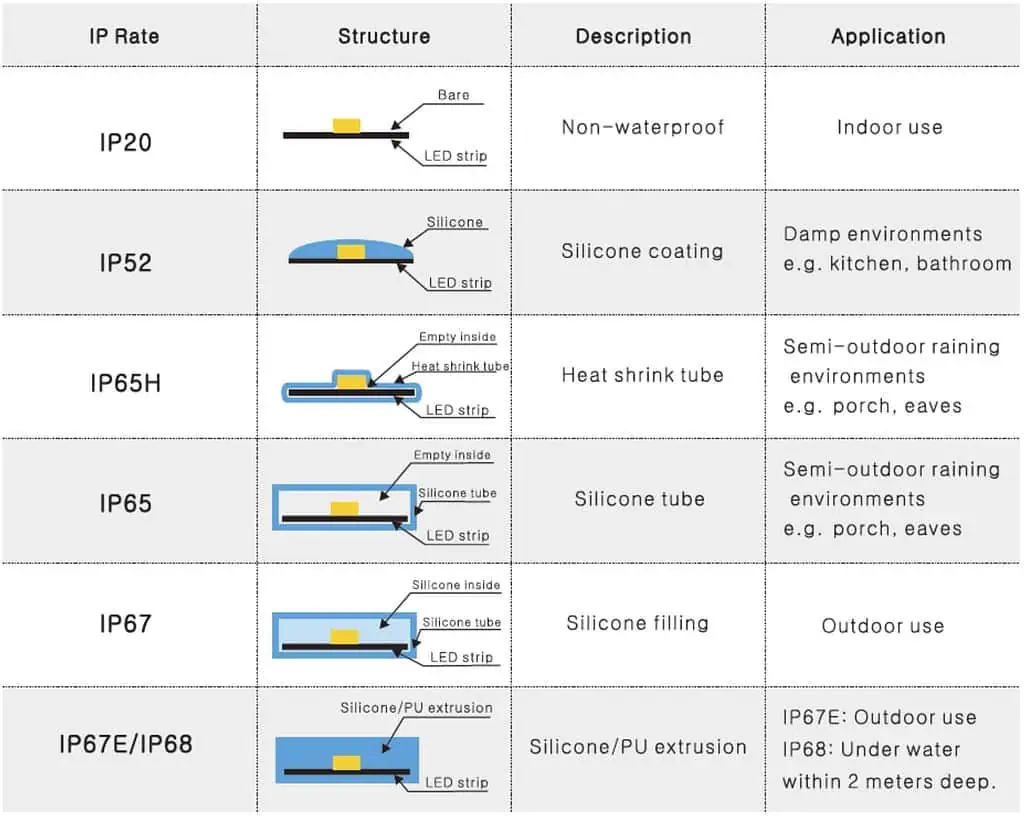
We provide the following waterproof and dustproof grades for customers to choose.
IP20: Bare, non-waterproof, indoor use, for dry environments.
IP52: Silicone coating, indoor use, for damp environments.
IP65: Silicone tube / Heat shrink tube, for semi-outdoor use, for raining environments
IP67: Silicone tube and silicone filling or solid silicone extrusion, outdoor use
IP68: PU(Polyurethane), underwater use.
Step 8: 3M Tape Pasting and Packaging
Once the LED strip passes the inspection, we will put 3M double-sided tape on the back of the LED strip. This makes it easier for customers to install LED strips, just tear off the 3M double-sided tape and stick it where they want.
Be sure to use high-quality 3M double-sided tape, which not only ensures stronger stickiness, but also increases heat dissipation and prolongs the life of the LED strip.
Each LED strip will be rolled onto a reel, and then each roll will be put into an anti-static aluminum foil bag. Then stick the label to the anti-static aluminum foil bag. And around 50 bags are packed into one box.
Quality Test:
Our final quality test is a random inspection of the LED strips ready for packaging. This helps us to maintain a high standard of quality.
Factors affecting the quality of LED strip lights
1. Quality of FPCB
High quality, 2-4 oz double-layer pure copper flexible PCBs ensure smooth passage of big current, reduce heat generation and help the heat to dissipate more quickly. Heat can have an effect on shortening the life of LEDs, so we need to find ways to dissipate it. By attaching the LED strip to aluminium profile we can dissipate as much heat as possible and reduce the working temperature.
2. Quality of SMD LEDs
Brand LED chips packaged with the highest quality of thermal pads, die bond materials, phosphors, and 99.99% gold bond wires.
Rigorous testing with LM-80 and TM-21 reporting.
High brightness, High CRI, Gamut Index, Fidelity Index, and Saturation
Make sure the BINs is good color consistency, within 3 step Macadam
3. Quality of Resistors
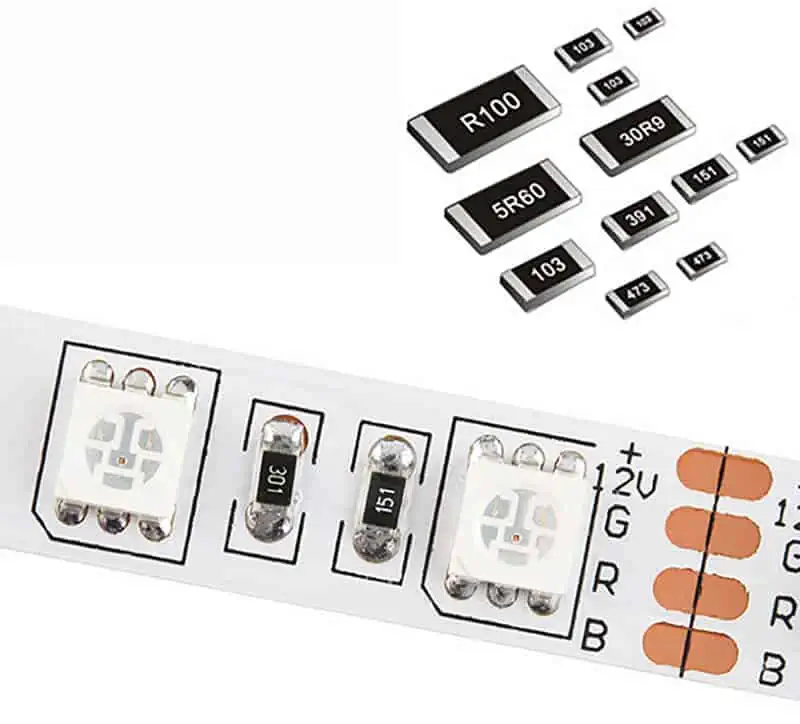
The resistors are used to regulate the forward current through the LEDs so that the LEDs operate at the designed brightness. The value of the resistor may change from batch to batch. Use a reputable company for resistors.
Please ensure that you use high quality resistors. Low quality resistors may shorten the life of the LED strip or even damage it.
Do not overpower your LEDs! They will appear brighter at first but will fail fast. We know a few of our competitors that do this. The excess heat may also be dangerous if installed on flammable materials.
4. Quality of wire and connectors
Always choose components that have been tested for safety and durability.
5. Quality of 3M Tape
We use 3M brand 300LSE or VHB tape. Many suppliers offer no-name or worse, fake brand name adhesives. The key to a long-lasting installation and thermal conductivity is a great quality tape.
6. Component Placement
It is also very important to ensure that all components are correctly and securely soldered to the PCB.
LED strips sometimes do not work properly because of bad soldering.
Conclusion
High quality LED strips can be more expensive. However, due to the low failure rate, high quality LED strips require little maintenance costs. As the cost of labor is much higher than the cost of the product, it will be more cost effective to choose a high quality LED strip. It’s always a good idea to do your research before making a purchasing decision. If you want to know more about LED strips or have any other questions, feel free to comment. Our goal is to provide high quality LED lighting solutions that will last you for years!
LEDYi manufactures high-quality LED strips and LED neon flex. All of our products go through high-tech laboratories to ensure the utmost quality. Besides, we offer customizable options on our LED strips and neon flex. So, for premium LED strip and LED neon flex, contact LEDYi ASAP!