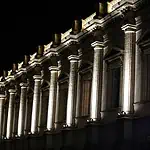
Wood panel walls have a natural charm that instantly makes a room feel warmer and more inviting. But here’s the secret: when you add the right LED lighting, those same panels can go from “nice” to “wow.” The light highlights the wood’s natural texture, sets the mood, and gives the whole space a polished look.
Sitting in your living room with a soft glow running along your wood wall, or walking into a restaurant where the panels are lit just enough to create a cozy but stylish vibe. It feels welcoming, modern, and special without complexity.
That’s exactly what this guide is about. We will explain the simple reasons why LEDs are perfect for wood walls, the different types of lights you can choose, easy installation tips, and real design ideas you can try yourself. No fancy jargon, just clear advice you can actually use.
What Is LED Lighting and Why Use It on Wood Panel Walls?
LED lighting (short for Light-Emitting Diodes) is one of today’s most popular choices. Unlike traditional bulbs, LEDs are small, energy-efficient, and available in many colors and brightness levels. They don’t get very hot, making them safe for use with materials like wood.
When combined with wood panel walls, LEDs do more than just light up a space; they enhance it. The soft glow can make wood look warmer, highlight textures, and even change the whole room’s atmosphere. Plus, slim and flexible LEDs can be hidden behind panels or placed neatly along edges without taking up space.
Benefits of Using LED Lighting on Wood Panel Walls
Adding LED lighting to wood panel walls isn’t just about looks; it also has many practical benefits. Here are the big ones:
1. Brings Out the Beauty of Wood
LEDs highlight the natural lines and wood grain, making the panels look richer and more stylish. Warm light can make a room feel cozy, while cooler light gives it a modern edge.
2. Creates the Right Mood
With dimmable or smart LEDs, you can change the mood of a room instantly. Want a soft glow for a movie night? Easy. Need brighter light for hosting friends? Just adjust it.
3. Energy-Saving and Long-Lasting
Unlike regular bulbs, LEDs use very little energy and last for years. That means lower electricity bills and less hassle with replacements, perfect if you’re setting up lights for a DIY project.
4. Flexible Design Options
LEDs come in strips, spots, and recessed styles, so you can get creative. Whether it’s a subtle backlight behind panels or a bold edge-lit frame, you can design the wall to match your style.
5. Safe for Wood Surfaces
Because LEDs produce very little heat, you don’t have to worry about damaging the wood panels. They’re safe, reliable, and easy to install.
Types of LED Lights for Wood Panel Walls
There are several kinds of LED lights you can use with wood panel walls. Each one creates a slightly different look, so the best choice depends on your style and the effect you want:
1. LED Strip Lights
These are flexible and slim, making them ideal for hiding behind panels or running along edges. They’re a popular DIY choice because they’re easy to install and can instantly give your wall a modern glow.
2. Recessed Linear LEDs
These lights sit flush within the panel design, creating a sleek, high-end look. They’re perfect for a clean, modern finish with no visible light source.
3. Spotlights or Wall Washers
Spotlights can focus on specific areas of the wall, while wall washers spread light evenly across the surface. Both are great for showing off the texture and grain of the wood.
4. LED Puck Lights
These are small, round lights often used to highlight sections of a wall or create a soft accent glow. They’re especially good for smaller wood panel features, like headboards or alcoves.
5. RGB and Smart LEDs
If you like variety, RGB LED strips let you change colors with a remote or app. Smart LEDs also connect to voice assistants, so you can switch from warm to cool tones or colors whenever you want.
Creative LED Lighting Ideas for Stunning Wood Panel Walls
LEDs are not just for light, they’re a design tool. With wood panels, you can use them in creative ways to completely transform the look of a room. Here are some inspiring ideas:

1. Backlit Floating Panels
Imagine a wooden wall that seems to hover slightly off the surface. By placing LED strips behind the panels, you create a glowing outline that makes the wall look like it’s floating. This effect works beautifully in living rooms, bedrooms, or entryways where you want an eye-catching feature. Even if you’re doing it as a DIY project, the trick is simple: mount the panels a few centimeters off the wall and hide the strips behind.
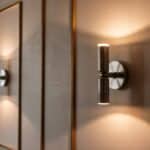
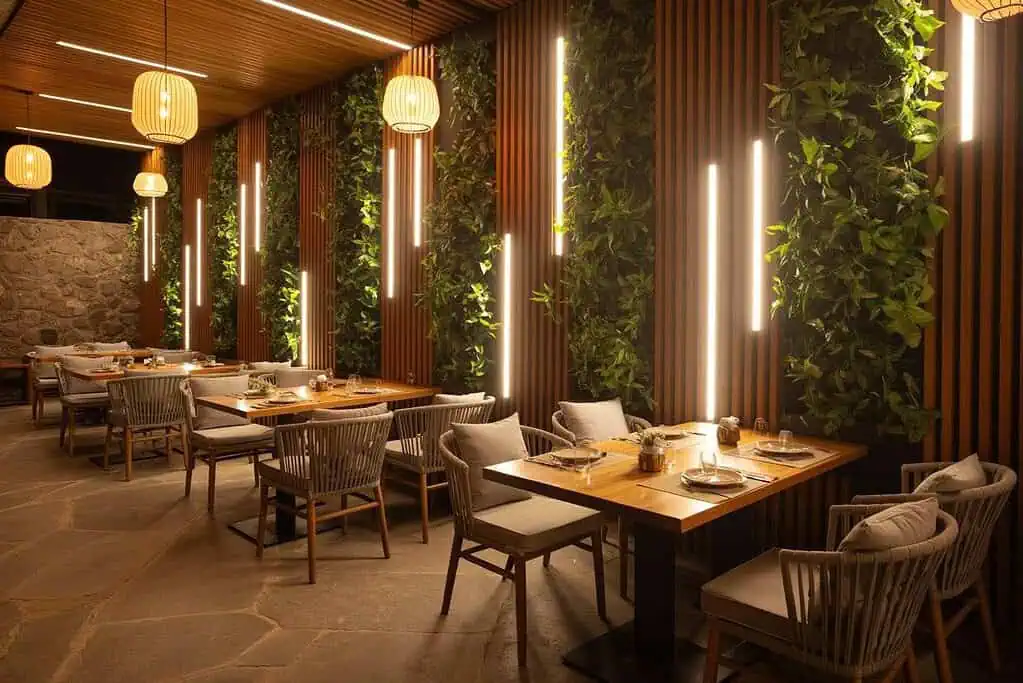
2. Edge-Lit Borders
Adding LEDs around the edges of your wood wall panels creates a framed glow that immediately draws attention. Darker woods like walnut or mahogany look especially striking with this method because the light contrasts with the rich tones. Use warm white light for a cozy atmosphere or cool white for a clean, modern feel.
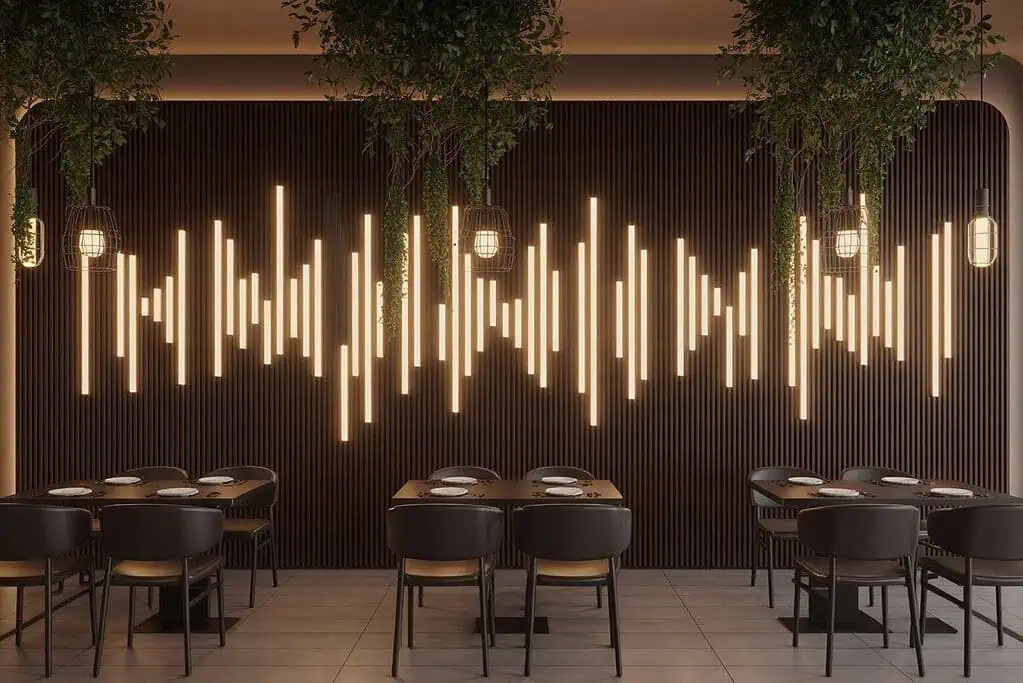
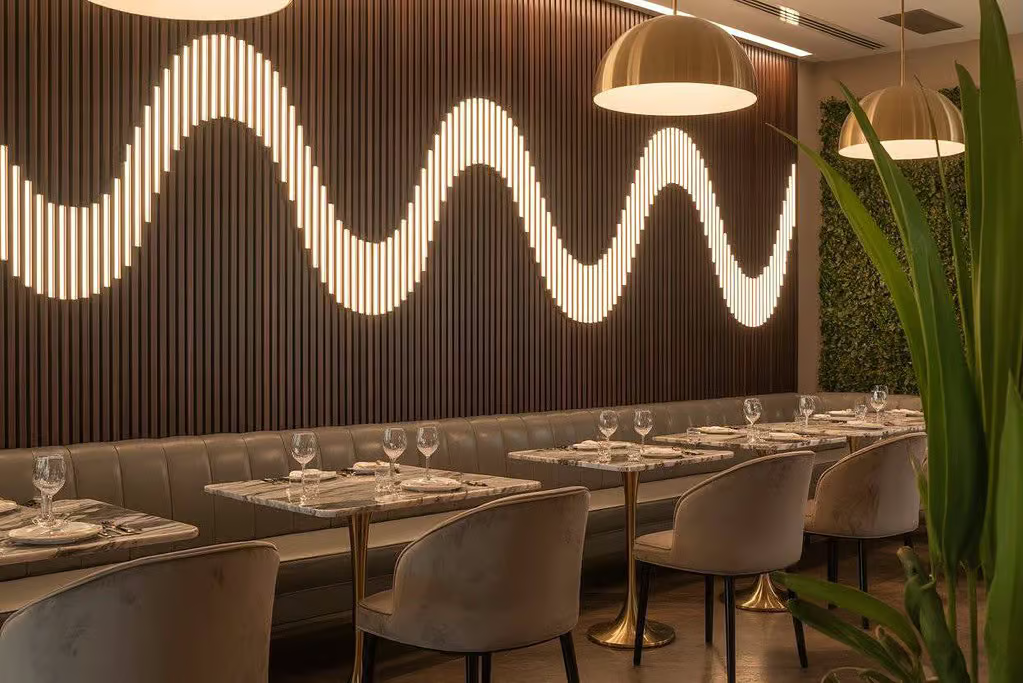
3. Accent Grooves and Slats
If your wall has vertical or horizontal slats, tuck slim LED strips inside the grooves. The light catches every line and adds depth, turning a plain wall into a piece of art. This is popular in modern bedrooms and office designs, where the wall becomes both decorative and functional.
4. Cozy Corners with Warm Glows
Sometimes less is more. A soft, warm LED glow along the edge of a wood panel is enough to make a bedroom corner or reading nook feel inviting. You don’t need bright lighting—just a gentle golden tone that makes the space comfortable.
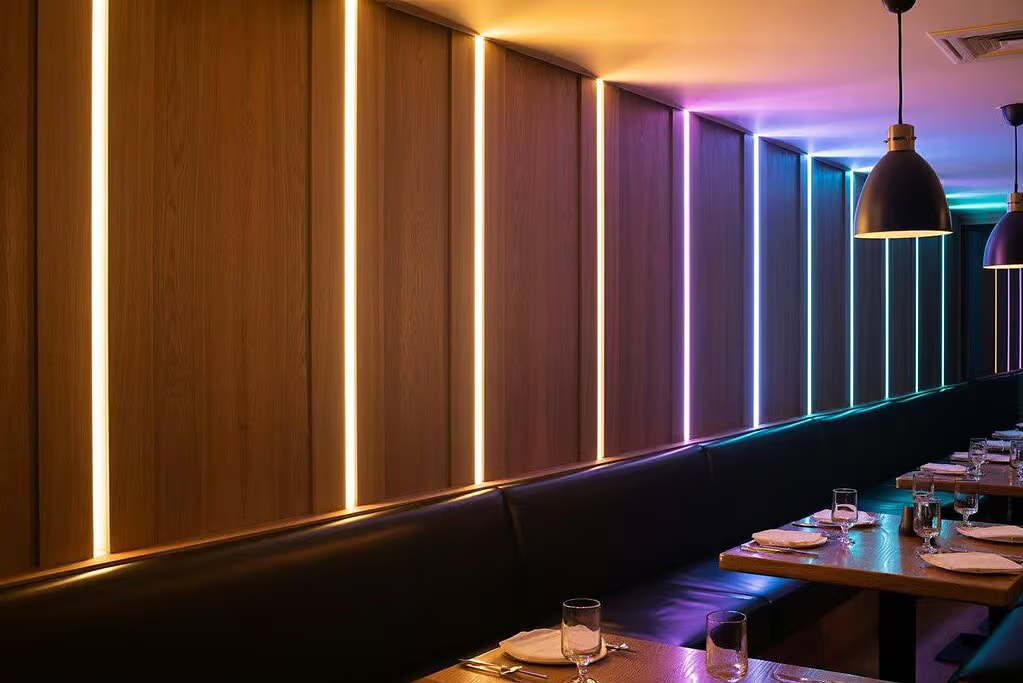
5. Bold Colors for Drama
If you enjoy experimenting, RGB or smart LEDs are perfect. You can usually set your wall to a calming, warm white, then switch to bold colors for parties, dinners, or just to match your mood. Imagine a restaurant wall glowing red during dinner service or a home wall lit up in soft blues for a calm evening.
6. Spotlight Highlights
Small LED spotlights aimed at the wall can create dramatic highlights and shadows. This style works well in dining rooms or art spaces where you want the wood texture to be the star. You can even angle spotlights to highlight a section of the wall behind artwork or furniture.
7. Layered Lighting Mix
The most stunning designs often mix different types of lighting. For example, you could backlight the entire wall for a soft glow, then add a few spotlights to highlight specific textures. This layering creates depth and gives you flexibility; you can use the glow for everyday lighting and turn on the spotlights for a more dramatic effect.
How to Choose the Right LED Lights for Wood Panel Walls
Choosing the right LEDs can feel overwhelming because there are so many options. But if you focus on a few simple factors, you’ll easily find the best lights for your wall.
1. Pick the Right Color Temperature
Color temperature means how “warm” or “cool” the light looks.
- Warm white (2700K–3000K) works beautifully with light woods like oak or pine, giving the wall a cozy glow.
- Neutral white (3500K–4000K) is ideal for darker woods like walnut. It makes the texture stand out without looking too yellow.
- Cool white (5000K+) creates a crisp, modern look—great for offices or commercial spaces.
2. Check the Brightness (Lumens)
Think about how you want the wall to feel:
- For soft mood lighting, 200–400 lumens per meter is enough.
- For stronger feature lighting, aim for 500–800 lumens per meter.
- If you want the wall to double as a main light source, go even higher.
3. Look for High CRI (Color Rendering Index)
CRI tells you how accurately the light shows colors. A CRI of 90+ is best because it makes wood look natural and rich. Cheaper LEDs often have low CRI, which can make wood tones look dull.
4. Choose Dimmable or Smart Options
If you want flexibility, go for dimmable LEDs or smart lights. These let you adjust brightness or switch between colors with an app or remote. It’s especially useful if the wall is in a space where you use different lighting moods, like a living room that doubles as a movie spot.
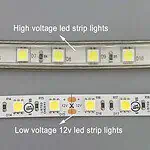
5. Think About Safety and Durability
If your panels are in a kitchen, bathroom, or outdoor area, choose waterproof LEDs (IP44 or higher). And always make sure the product has safety marks (like CE or UL).
Step-by-Step Guide to Installing LED Lighting on Wood Panel Walls
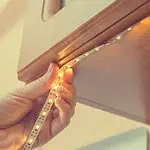
Adding LED lights to wood panels might look like a professional job, but with the right steps, it’s a very doable DIY project. Here’s a simple guide to get you started:
1. Plan Your Design First
Before buying anything, decide how you want your wall to look. Do you want a soft backlight, glowing edges, or accent strips in the grooves? Sketch out the design or mark the spots with painter’s tape. Planning saves time and avoids mistakes later.
2. Measure Your Wall and Buy the Right LEDs
Measure the length and width of the wall (or the specific sections you want to light). This will tell you how many meters of LED strips you need. Always buy a little extra; you can cut strips down, but you can’t stretch them if you fall short.
3. Choose Mounting Style
- Adhesive Backing: Most LED strips come with sticky tape on the back. Good for smooth surfaces.
- Aluminum Channels: A sturdier option. They hold the LEDs in place, protect them, and help spread the light evenly. They are great if you want a clean, long-lasting finish.
4. Prepare the surface area
Clean the wood panels so they’re free of dust and oil. LEDs stick best on a smooth, dry surface. If you’re using aluminum channels, screw them in place before adding the strips.
5. Install the LED Strips
Stick the LED strips where you planned them. Work slowly to avoid crooked lines. If you’re going around corners, use connector clips instead of bending the strip too sharply.
6. Connect to the Power Supply
Plug the LED strips into the driver (the small box that powers the LEDs). If it’s a plug-and-play kit, this part is easy; just connect and plug it into a wall socket. If you’re wiring directly to your home’s power, you may need an electrician for safety.
7. Hide the Wires
Nothing ruins a sleek LED wall like visible wires. Hide cables behind panels, along skirting boards, or inside small channels. Always leave a little extra wire (called a service loop) in case you need to adjust later.
8. Test Before Finishing
Turn the lights on before you finish sealing everything. This way, you can check for dim spots, flickering, or misaligned strips. Fixing problems now is much easier than after the wall is complete.
9. Add Smart Controls (Optional)
If you’re using smart LEDs, connect them to your app, remote, or voice assistant. This is where you can play with dimming, color changes, and preset scenes.
10. Enjoy Your New Feature Wall
Step back, turn off the room’s main lights, and enjoy how your wood panels glow. A simple DIY project just transformed your space into something stunning.
Cost of Installing LED Lighting for Wood Panel Walls
The cost of adding LED lighting to wood panel walls depends on the type of lights, the size of the wall, and whether you choose a DIY setup or professional installation. Here is a clear breakdown:
1. DIY Installations (Budget-Friendly)
For small projects, a basic LED strip kit with a remote can cost between $20 and $60. If you want a neater finish, aluminum channels may add $30 to $80. Including connectors and accessories, most DIY projects for a medium wall cost between $70 and $150.
2. Mid-Range Options
If you prefer higher-quality LED strips, dimmable features, or smart controls, the cost increases. High-quality strips typically cost $50 to $120, while smart controllers or dimmers range from $30 to $100. With better aluminum channels and diffusers, the total usually comes to $150 to $300.
3. Professional Installations (Premium Choice)
Hiring a professional ensures a polished and long-lasting finish, especially for more complex designs. Labor costs can range from $200 to $500, depending on the scope of the work. Premium LED systems with smart controls may add $200 to $500 or more. A large feature wall with a custom design may cost $700 to $1,500+.
4. Long-Term Value
While the initial cost may seem high, LEDs are very efficient and last for many years. This reduces electricity bills and replacement costs, making LED lighting a cost-effective choice in the long run.
Safety Tips for LED Lighting on Wooden Surfaces
Using LEDs on wood panel walls is generally safe, but there are a few things you should always keep in mind:
- Avoid Overheating: Use aluminum channels to hold LED strips and keep the wood from getting too warm.
- Use the Right Power Supply: Match your LED strips with the correct driver or transformer to prevent flickering or overheating.
- Choose Certified Products: Always pick LEDs with safety marks like CE, UL, or RoHS for reliable performance.
- Keep Wires Neat: Secure wires with clips or channels and avoid crushing them behind the panels.
- Use Waterproof LEDs in Wet Areas: Pick IP44 or higher LEDs for kitchens, bathrooms, or outdoor walls.
- Call a Professional if Needed: DIY kits are fine, but hire an electrician for complex wiring.
FAQs
Conclusion
Wood panel walls already bring warmth and style into a room, but adding LED lighting takes them to the next level. With the right lights, you can highlight natural textures, create a cozy or modern mood, and even make a plain wall the main feature of your space.
The best part is that LED lighting is flexible—you can keep it simple with a DIY strip kit or go all-in with a custom, professional design. Either way, it’s safe, energy-efficient, and long-lasting, making it a smart choice for both homes and businesses.
If you’re planning a project, start small: try a backlit headboard or a glowing living room feature wall. Once you see the difference, you’ll understand why LED lighting for wood panel walls is one of the easiest and most effective ways to upgrade a space.